Thursday, October 11, 2018

VMware ESXi SCSI Sense Code Decoder

https://www.virten.net/vmware/esxi-scsi-sense-code-decoder/

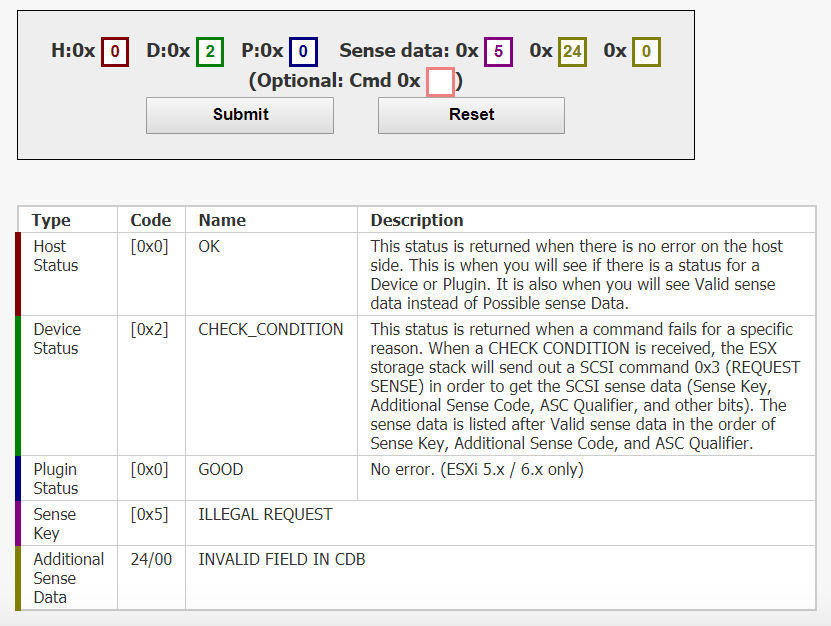
SCSI errors or warnings in ESXi are displayed with 6 status codes. This page converts these sense codes from ESXi Hosts to human readable status information. In the vmkernel.log system log file from an ESXi 5.x or 6.0 hosts, you see entries similar to the following.

ScsiDeviceIO: [...] Cmd 0x1a [...] to dev "naa.x" failed H:0x0 D:0x2 P:0x0 Valid sense data: 0x5 0x24 0x0.


Monday, August 20, 2018

HP ILO SSL_ERROR_BAD_MAC_ALERT Firefox Chrome

The wonderful security updates in Firefox (and Chrome) will give you the dreaded SSL_ERROR_BAD_MAC_ALERT. So no more ILO for you 
How to mitigate that?, well first do as told in the article above, go to about:config in firefox and set the security.tls.version.fallback-limit to 1.
How you can access the ILO and update the firmware to 2.29 for ILO2 (or higher), as instructed here, you can fetch the ILO2 firmware  Here
HP has a habit of only updating the Windoze firmware binaries, forgetting that most of the internet runs on Linux, but anyway just download the EXE and extract the ilo229.bin from the file.
If you don’t like the clickerdyclick web interface, or have more than 2 servers to update, it makes sense to put your binary on some web server  in your environment and just ssh into your ILO and update from there, the magic is done like so:
load -source http://192.168.1.11/iso/HP/Firmware/ilo2_229.bin /map1/firmware1
(192.168.1.11/iso…. is our internal web server of course, replace with your own)
O and don’t forget to set your FireFox security.tls.version.fallback-limit back to 3

Monday, October 23, 2017

Installing Java 7, 8, and 9 on Ubuntu and Linux Mint

original post from: http://dcjtech.info/topic/installing-java-7-8-and-9-on-ubuntu-and-linux-mint/

Java is used by many computer users. Obviously, Ubuntu and Linux Mint users need Java and they may wish to use Java 7, 8, or 9. Currently, Oracle's Java is not in the default repos, so here is how users can install it.

Java 7

Run the below code in a command-line with Root privileges.
add-apt-repository ppa:webupd8team/java

apt-get update

apt-get install oracle-java7-installer
Running "apt-get install oracle-java7-set-default" will set the global Java 7 system/environment variables and remove the variables of other Java versions.

Java 8

Run the below code in a command-line with Root privileges.
add-apt-repository ppa:webupd8team/java

apt-get update

apt-get install oracle-java8-installer
The "oracle-java8-installer" package downloads an installer that obtain Java from Oracle directly. Java itself is not in the PPA.
Running "apt-get install oracle-java8-set-default" will set the global Java 8 system/environment variables and remove the variables of other Java versions..

Java 9

Run the below code in a command-line with Root privileges to obtain Java 9 on Ubuntu, Linux Mint, and other distros that support PPAs.
add-apt-repository ppa:webupd8team/java

apt-get update

apt-get install oracle-java9-installer

Verify Installations

Java installations can be verified by executing "java -version" or "javac -version".

Switch Between Javas

To make Java 7 the default, run "update-java-alternatives -s java-7-oracle". Alternately, to make Java 8 the default, run "update-java-alternatives -s java-8-oracle". Obviously, "update-java-alternatives -s java-9-oracle" makes Java 9 the default. All of these commands require Root privileges.

Sunday, August 20, 2017

HP 3PAR REPLACING A FAILED DISK


Replacing a failed disk in a 3PAR is pretty simple you just need to follow a few steps to make sure you do it safely. If you are new to 3PAR or would like to learn more a good place to start is our 3PAR beginners guide
Let’s get started with the disk replacement procedure:
1 Check to see if you have any failed or degraded disks in the system. Take a note of the disk ID and cage position. In this case disk ID =26, cage position = 2:8:0
3PARSAN01 cli% showpd -failed -degraded

                           -Size(MB)-- ----Ports----

Id CagePos Type RPM State   Total Free A     B     Cap(GB)

46 2:8:0? FC   10 failed 417792   0 ----- -----     450

------------------------------------------------------------

 1 total                  417792   0
2 Check if the disk sevicemag command is running on the drive. The servicemag command is used to inform the system to evacuate all the chunklets from a drive so that it is ready for service. Below we can see the servicemag has succeeded on the drive we identified in step 1.
3PARSAN01 cli% servicemag status

Cage 2, magazine 8:

The magazine was successfully brought offline by a servicemag start command.

The command completed Thu Jul 10 20:07:03 2014.

servicemag start -pdid 46 – Succeeded
3 Next we double check there is no data left on the drive. You can do this by running showpd –space driveID as below. You need to check that all columns other than size and failed are zero
3PARSAN01 cli% showpd –space 46

Id CagePos Type -State-   Size Volume Spare Free Unavail Failed
46 2:8:0? FC   failed 417792     0                 0     0          0         417792

---------------------------------------------------------------

1 total                        417792     0            0   0          0        417792

4 Next to replace the physical disk. Make sure you are happy with the above steps. Then pop that bad boy out, you will have a note of the location of the failed drive from step 1.

5 Once the disk is in you can monitor the progress of the rebuild by running servicemag status, which will give you an ETA for completion.
3PARSAN01 cli% servicemag status

Cage 2, magazine 8:

The magazine is being brought online due to a servicemag resume.

The last status update was at Thu Jun 26 12:09:19 2014.

Chunklets relocated: 73 in 50 minutes and 34 seconds

Chunklets remaining: 400

Chunklets marked for moving: 400

Estimated time for relocation completion based on 41 seconds per chunklet is: 4hours, 57 minutes and 39 seconds

servicemag resume 2 8 -- is in Progress
6 Once this is complete you can check that your disks are showing in a normal state with showpd -state
3PARSAN01 cli% showpd -state

Id CagePos Type -State- --------------------Detailed_State---------------------

43 2:5:0   FC   normal normal

44 2:6:0   FC   normal normal

45 2:7:0   FC   normal normal

46 2:8:0 FC   normal normal

47 2:9:0   FC   normal normal
That’s it, job done!

How to shutdown 3PAR

I recently did the power down of a datacentre containing a 3PAR and wanted to quickly cover off the steps that I followed to power off and then back on.
First of all I did a health check to check for any issues such as a failed disk:
3PAR1% checkhealth
 Checking alert
 Checking cabling
 Checking cage
 Checking cert
 Checking dar
 Checking date
 Checking fs
 Checking host
 Checking ld
 Checking license
 Checking network
 Checking node
 Checking pd
 Checking port
 Checking rc
 Checking snmp
 Checking task
 Checking vlun
 Checking vv
 Component
Also check if all connected host are not using 3PAR. Best way using command statvv

All looked OK so I proceeded with the shutdown.  You have 3 methods to shutdown SPmaint, SPOCC or via CLI.  I would recommend using SPmaint, or SPOCC  if possible.

SPOCC

1 Connect via web GUI to your Service Processor
2 Select SPmaint on the left hand menu
3 Choose StoreServ Product Maintenance

4 Choose halt a storeServ cluster/node
8-halt
5 Choose to shutdown the cluster, not the separate nodes
6 Wait about 5 minutes, then follow the hardware steps later in the post
CLI
You will need to logon with a local admin account
To begin the shutdown:
3PAR1% shutdownsys halt
You will See the following prompt
-----System Information------
 System Name   : 3PAR1
 System Model  : HP_3PAR 7200c
 Serial Number : 1666666

------------------Partial List Of Hosts-------------------
 Id Name       Persona       -WWN/iSCSI_Name- Port  IP_addr
 ANY HOSTS STIL CONNECTED LISTED HERE

Shutting down this storage system will impact applications running on the hosts displayed above

Do you REALLY want to HALT this storage system? yes or no:


The system will HALT in 12 seconds

Press the enter key to stop...

No tasks can be running such as Adaptive Optimization. Then follow the hardware steps in the following section.

HARDWARE STEPS

1 Wait aprox 5 mins for shut down
2 Check the node Status LED is flashing green and the node hotplug LED is blue
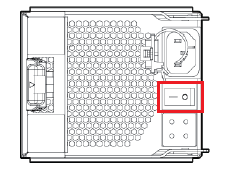
3 Turn off the node PCM switches at the back of the controller nodes. (Diagram borrowed from HP 3PAR StoreServ 7000 and 7000c Storage Service Guide)
4 Turn off the node PCM switches at the back of the disk shelves

POWER ON

3PAR will automatically turn its self back on when power is detected so you will just need turn the PCM switches back on.  The order is the reverse of power off:
1 Turn on the node PCM switches at the back of the disk shelves
2 Turn on the node PCM switches at the back of the controller nodes

It would of course be sensible to do a checkhealth after power up to check everything looked OK. If you found this useful you will be interested to see our selection of the best 3PAR posts selected from the 150 posts written on the topic within this blog.

Thursday, January 5, 2017

How to check Fibre Channel HBAs in Linux

Fibre Channel (FC) Host Bus Adapters(HBA) are interface cards that connects the host system to a fibre channel network or devices. The two major manufacturers of FC HBAs are QLogic and Emulex and the drivers for many HBAs are distributed in-box with the Operating Systems. If the drivers are not available on your Linux version, you need to install them manually and load the modules in kernel
Here is a step by step guide to verify that your FC HBAs installed and configured correctly.

Step-1: Determine the Manufacturer and Model of the HBAs.

Run the lspci command to list all PCI cards detected on the system.
# lspci | grep "Fibre Channel"
07:00.0 Fibre Channel: QLogic Corp. ISP2532-based 8Gb Fibre Channel to PCI Express HBA (rev 02)
0a:00.0 Fibre Channel: QLogic Corp. ISP2532-based 8Gb Fibre Channel to PCI Express HBA (rev 02)
The above output shows the system bus has detected two QLogic HBAs.

Step-2: Get the Vendor and Device IDs for the HBAs installed.

These can be obtained from the file /usr/share/hwdata/pci.ids
# vi /usr/share/hwdata/pci.ids
.....
1077  QLogic Corp.
 2532  ISP2532-based 8Gb Fibre Channel to PCI Express HBA
.....
The vendor id for QLogic is 1077 and the device id is 2532. You could confirm this using the lspci -nn command as shown below
# lspci -nn | grep "Fibre Channel"
07:00.0 Fibre Channel [0c04]: QLogic Corp. ISP2532-based 8Gb Fibre Channel to PCI Express HBA [1077:2532] (rev 02)
0a:00.0 Fibre Channel [0c04]: QLogic Corp. ISP2532-based 8Gb Fibre Channel to PCI Express HBA [1077:2532] (rev 02)

Step-3: Check if the driver modules are installed.

This can be done by searching the list of available modules. (Replace 2.6.18-308.el5PAE with your kernel version in the command below)
# grep 1077 /lib/modules/2.6.18-308.el5PAE/modules.* | grep 2532
/lib/modules/2.6.18-308.el5PAE/modules.alias:alias pci:v00001077d00002532sv*sd*bc*sc*i* qla2xxx
/lib/modules/2.6.18-308.el5PAE/modules.pcimap:qla2xxx              0x00001077 0x00002532 0xffffffff 0xffffffff 0x00000000 0x00000000 0x0
The above output shows that this HBA is supported by the module qla2xxx

Step-4: Check if the drivers for these HBAs are loaded in the kernel.

The lsmod command will list the currently loaded kernel modules
# lsmod | grep qla2xxx
qla2xxx              1205905  0
scsi_transport_fc      44745  1 qla2xxx
scsi_mod              144277  16 be2iscsi, ib_iser, iscsi_tcp, bnx2i, libcxgbi, libiscsi2, scsi_transport_iscsi2, scsi_dh, sr_mod, sg, usb_storage, qla2xxx, scsi_transport_fc, libata,cciss, sd_mod
The output shows the module qla2xxx is loaded by the kernel. If you don't see any output for lsmod command then you can load the module using modprobe command
# modprobe -v qla2xxx

Step-5: Getting detailed information

You can find detailed information about the fibre channel adapters in the location /sys/class/fc_host/
# ll /sys/class/fc_host/
drwxr-xr-x 3 root root 0 Feb  5 11:28 host3
drwxr-xr-x 3 root root 0 Feb  5 11:28 host4
The directories host3 and host4 in the example above contains information specific to each adapter like node name (WWN), port name (WWN), type, speed,state etc.,
An easier way to get this information is to use the systool command.
# systool -c fc_host
Class = "fc_host"
  Class Device = "host3"
    Device = "host3"
  Class Device = "host4"
    Device = "host4"
The -v option gives you detailed output
# systool -c fc_host -v host3
Class = "fc_host"

 Class Device = "host3"
 Class Device path = "/sys/class/fc_host/host3"
   fabric_name         = "0x50014380272531e9"
   issue_lip           = 
   node_name           = "0x50014380281412e9"
   port_id             = "0x0000e8"
   port_name           = "0x50014380281412e8"
   port_state          = "Online"
   port_type           = "LPort (private loop)"
   speed               = "8 Gbit"
   supported_classes   = "Class 3"
   supported_speeds    = "1 Gbit, 2 Gbit, 4 Gbit, 8 Gbit"
   symbolic_name       = "HPAK344A FW:v5.06.03 DVR:v8.03.07.09.05.08-k"
   system_hostname     = ""
   tgtid_bind_type     = "wwpn (World Wide Port Name)"
   uevent              = 

   Device = "host3"
   Device path = "/sys/devices/pci0000:00/0000:00:01.0/0000:07:00.0/host3"
     edc               = 
     fw_dump           =
     nvram             = "ISP "
     optrom_ctl        = 
     optrom            =
     reset             = 
     sfp               = ""
     uevent            = 
     vpd               = "&"

Tuesday, September 6, 2016

Mac OS X - Adding a Networked Print Queue (SMB)


Original link: https://it.faa.illinois.edu/services/printing/57-printing-services/220-add-printer-mac-smb

Overview

These directions explain how to add a networked printer on Mac OS X via the SMB protocol. This is typically used for:
AD-bound Macs may occasionally connect to a Windows server via SMB as well.

Systems

Users

  • All users of above systems

Actions

  1. Gather the following information for the networked printer: server URL, queue name, printer location, and printer model information/features. This information may be available on the printing documentation page for your department. If you cannot locate any of this information, please create an Technology Services at FAA Help Desk help request.
  2. (If necessary) Download and install the appropriate driver for the printer. If your Mac is Fully Managed or Semi-Managed, the driver may already be installed. Please create an Technology Services at FAA Help Desk help request if you need assistance.
  3. Open System Preferences.app. 3-system preferences
  4. Click on "Print & Scan" and unlock the preference pane (if necessary). 4-print and scan
  5. Click on "+" underneath the list of printers and select "Add Printer or Scanner..." in the menu that appears. 5-add printer scanner
  6. An "Add" window will appear. If there is not already an "Advanced" button in its toolbar (on top, alongside "Default", "Fax", "IP", etc.), you'll need to customize the toolbar. Control+click on the toolbar area and select "Customize Toolbar...". 6-smb-customize-toolbar
  7. Drag the "Advanced" item up onto the toolbar and click "Done". 7-smb-drag-advanced
  8. Click on the "Advanced" button. 8-smb-click-on-advanced
  9. Then enter/select the following:
    • Type: "Windows printer via spoolss"
    • Device: "Another Device"
    • URL: smb:///
    • Name: enter a descriptive name here (suggestion: include the queue name so that Technology Services at FAA can help troubleshoot later, if necessary)
    • Location: enter the location for your reference
    • Use: Generally select "Select Printer Software...", locate the appropriate driver for the printer, and click "OK".
    (Reminder: Address, Queue, Location, and installed options for the printer may be available on the printing documentation page for your department. If you cannot locate any of this information, please create an Technology Services at FAA Help Desk help request.)
    9-smb-enter-info
  10. Click "Add". 10-smb-click-add
  11. Configure the appropriate installed options for the printer, then click "OK". 11-smb-options
  12. The first time you print, you will generally be prompted to authenticate with your Active Directory (AD) credentials. Please enter uofi\ and your Active Directory password. You may save your credentials in your Keychain by first checking the appropriate box in the authentication window. osx_smb_print_auth

How to use DiskSpd to simulate Veeam Backup & Replication disk actions

This HOW-TO contains information on how to use Microsoft© DiskSpd to simulate Veeam Backup & Replication disk actions to measure disk pe...