Original text from: http://wiki-ux.info/wiki/How_to_mirror_a_boot_disk
Abstract
Using Logical Volume Manager (LVM) to mirror a HP-UX system boot disk is an standard security practice if the Mirror/UX bundle is available. The following article details the procedure to acomplish this task on HP-UX 11i systems with LVM boot disks.Contents
|
HP 9000 11i v1 (11.11) / 11i v2 (11.23)
1. Identify the available disk to mirror the vg00 logical volumes.# strings /etc/lvmtab | grep dev /dev/vg00 /dev/dsk/c3t3d0
# ioscan -funC disk
disk      0  1/0/1/0/0/1/3.0.6   sdisk    CLAIMED     DEVICE       HP 36.4GST336607FC
                           /dev/dsk/c3t6d0   /dev/rdsk/c3t6d0
disk      1  1/0/1/0/0/1/3.#.0   sdisk    CLAIMED     DEVICE       HP 36.4GST336607FC
                           /dev/dsk/c#t#d#   /dev/rdsk/c#t#d#
2. Create and populate the boot disk LIF area. Be sure to use the "-B" flag to allocate space for the BDRA
# pvcreate -fB /dev/rdsk/c#t#d#
# mkboot /dev/rdsk/c#t#d#
3. Change the AUTO file on both boot disks to hpux -lq so the host can boot without quorum if one mirror disk fails.
# mkboot -a "hpux -lq" /dev/rdsk/c#t#d#
# mkboot -a "hpux -lq" /dev/rdsk/c#t#d#
4. Check the boot string in the AUTO file. This command should output: "hpux -lq"
# /usr/bin/lifcp /dev/rdsk/c#t#d#:AUTO -5. Add the disk to vg00.
# vgextend vg00 /dev/dsk/c#t#d#6. Mirror all vg00 logical volumes
# lvextend -m 1 /dev/vg00/lvol# /dev/dsk/c#t#d#7. Verify that the BDRA is up to date.
# lvlnboot -R8. Add a line to /stand/bootconf so SD-UX knows which disks are boot disks.
# vi /stand/bootconf
l /dev/dsk/c#t#d#
l /dev/dsk/c#t#d#
9. Configure the second disk as an alternate boot path in the system NVRAM.
# setboot -p #/#/#/#/#.#.#
# setboot -a #/#/#/#/#.#.#
10. Check the status of the NVRAM configuration.
# setboot
HP 9000 11i v3 (11.31) with persistent DSF
Mirroing boot disks on HP-UX 11.31 HP 9000 system can been done using the legacy special devices files or the new persistent devices file of the new Mass Storage Stack, also know as Agile View. This document discuses Agile View.1. Identify an available disk to add to vg00.
# ioscan -funC disk
Class     I  H/W Path       Driver S/W State   H/W Type     Description
=======================================================================
disk      5  0/1/1/0.1.0    sdisk   CLAIMED     DEVICE       HP 36.4GST336754LC
                           /dev/dsk/c2t1d0   /dev/rdsk/c2t1d0
disk      0  0/1/1/1.0.0    sdisk   CLAIMED     DEVICE       HP 36.4GST336754LC
                           /dev/dsk/c3t0d0   /dev/rdsk/c3t0d0
# ioscan -m dsf
Persistent DSF           Legacy DSF(s)
========================================
/dev/rdisk/disk7         /dev/rdsk/c3t0d0
/dev/rdisk/disk12        /dev/rdsk/c2t1d0
# ioscan -N -fnkC disk
Class     I  H/W Path  Driver S/W State   H/W Type     Description
===================================================================
disk      7  64000/0xfa00/0x0  esdisk   CLAIMED     DEVICE       HP 36.4GST336754LC
                      /dev/disk/disk7   /dev/rdisk/disk7
disk     12  64000/0xfa00/0x5  esdisk   CLAIMED     DEVICE       HP 36.4GST336754LC
                      /dev/disk/disk12   /dev/rdisk/disk12
# ioscan -m hwpath
Lun H/W Path      Lunpath H/W Path                 Legacy H/W Path
====================================================================
64000/0xfa00/0x0
                  0/1/1/1.0x0.0x0                  0/1/1/1.0.0
64000/0xfa00/0x5
                  0/1/1/0.0x1.0x0                  0/1/1/0.1.0
2. Use pvcreate and mkboot to format and populate the disk:
# pvcreate -f -B /dev/rdisk/disk7
# mkboot -l /dev/disk/disk7
3. Change the AUTO file on both boot disks to hpux -lq so the host can boot without quorum if one mirror disk fails.
# mkboot -a "hpux -lq" /dev/rdisk/disk12
# mkboot -a "hpux -lq" /dev/rdisk/disk7
4. Add the disk to vg00. Be sure to use the "-B" flag to allocate space for the BDRA.
# vgextend /dev/vg00 /dev/disk/disk75. Starting with the boot, swap, and root logical volumes, run lvextend to mirror each logical volume:
# /usr/sbin/lvextend -m 1 /dev/vg00/lvol1 /dev/disk/disk7
# /usr/sbin/lvextend -m 1 /dev/vg00/lvol2 /dev/disk/disk7
# /usr/sbin/lvextend -m 1 /dev/vg00/lvol3 /dev/disk/disk7
# /usr/sbin/lvextend -m 1 /dev/vg00/lvoln /dev/disk/disk7
6. Run the following lvlnboot commands to reestablish LVM’s knowledge of the root and boot file systems and primary swap and dump.
# /usr/sbin/lvlnboot -b /dev/vg00/lvol1
# /usr/sbin/lvlnboot -r /dev/vg00/lvol3
# /usr/sbin/lvlnboot -s /dev/vg00/lvol2
# /usr/sbin/lvlnboot -d /dev/vg00/lvol2
# /usr/sbin/lvlnboot -R
7. Add the block device special file of the HP-UX (second) disk to the file /stand/bootconf. The lower case "l" in the following command indicates that the disk is managed by LVM or VxVM.
# /usr/bin/echo "l /dev/disk/disk7" >> /stand/bootconf8. If desired, set the alternate boot path to the mirror_disk using the Lunpath H/W Path. Check step 1.
# /usr/sbin/setboot -a 0/1/1/1.0x0.0x0
Integrity 11i v2 (11.23)
1. Identify the available disk to mirror the vg00 logical volumes.# strings /etc/lvmtab /dev/vg00 /dev/dsk/c0t6d0s2
# ioscan -fnkC disk
Class     I  H/W Path        Driver   S/W State   H/W Type     Description
===========================================================================
disk      0  1/0/0/3/0.6.0   sdisk    CLAIMED     DEVICE       HP 36.4GMAS3367NC
                            /dev/dsk/c0t6d0     /dev/rdsk/c0t6d0
                            /dev/dsk/c0t6d0s1   /dev/rdsk/c0t6d0s1
                            /dev/dsk/c0t6d0s2   /dev/rdsk/c0t6d0s2
                            /dev/dsk/c0t6d0s3   /dev/rdsk/c0t6d0s3
disk      1  1/0/1/1/1.#.0  sdisk    CLAIMED     DEVICE       HP 36.4GMAS3367NC
                            /dev/dsk/c#t#d0     /dev/rdsk/c#t#d0
2. Use the following commands to determine the size in megabytes of
the (1) EFI, (2) HP-UX, and (3) HPSP partitions on the current boot
disk:
# /usr/sbin/diskinfo -b /dev/rdsk/c0t6d0s1 \
| awk '{print $1 / (1024)}'
# /usr/sbin/diskinfo -b /dev/rdsk/c0t6d0s2 \
| awk '{print $1 / (1024)}'
# /usr/sbin/diskinfo -b /dev/rdsk/c0t6d0s3 \
| awk '{print $1 / (1024)}'
3. Create an IPF partition description file to create the EFI and OS
partititions using your favorite method. Theses two example shows how to
create a IPF description file with an EFI partition of 500 Megabytes
and a HPSP partiiton of 400 Megabytes.
# print '3\nEFI 500MB\nHPUX 100%\nHPSP 400MB' > /tmp/idf4. Use idisk to setup the disk partitioning using the file created above:
# idisk -wf /tmp/idf /dev/rdsk/c#t#d#
NOTE: There will be a prompt with a message saying the operation may be destructive and asks to continue. Answer yes
for the operation to be successful. If the prompt is answered with only
the 'y' character an error will be received along with a message user aborting.
5. Use the insf command to create device files for all the newly-created partitions.
# /usr/sbin/insf -e -H6. Use mkboot to format and populate the newly created EFI partition:
# mkboot -e -l /dev/dsk/c#t#d#7. Change the AUTO file on both boot disks to "boot vmunix -lq" so the host can boot without quorum if one mirror disk fails.
# print 'boot vmunix -lq' > /tmp/auto
# efi_cp -d /dev/rdsk/c#t#d#s1 /tmp/auto /efi/hpux/auto  # Primary disk
# efi_cp -d /dev/rdsk/c#t#d#s1 /tmp/auto /efi/hpux/auto  # Alternate disk
8. Run the pvcreate command on the character device file for the HP-UX (second) partition of the mirror disk, using the "-B" flag to make the disk bootable, and the "-f" flag to overwrite any pre-existing data on the disk.
# /usr/sbin/pvcreate -f -B /dev/rdsk/c#t#d#s29. Extend the root volume group to the HP-UX partition of the mirror disk, using the block device file of the second EFI partition.
# /usr/sbin/vgextend /dev/vg00 /dev/dsk/c#t#d#s210. Starting with the boot, swap, and root logical volumes, run lvextend to mirror each logical volume on the volume group.
# /usr/sbin/lvextend -m 1 /dev/vg00/lvol1 /dev/dsk/c#t#d#s2
# /usr/sbin/lvextend -m 1 /dev/vg00/lvol2 /dev/dsk/c#t#d#s2
# /usr/sbin/lvextend -m 1 /dev/vg00/lvol3 /dev/dsk/c#t#d#s2
# /usr/sbin/lvextend -m 1 /dev/vg00/lvol# /dev/dsk/c#t#d#s2
11. Run the following lvlnboot commands to establish LVM’s knowledge of the root and boot file systems and primary swap and dump on the alternate disks.
# /usr/sbin/lvlnboot -b /dev/vg00/lvol1
# /usr/sbin/lvlnboot -r /dev/vg00/lvol3
# /usr/sbin/lvlnboot -s /dev/vg00/lvol2
# /usr/sbin/lvlnboot -d /dev/vg00/lvol2
# /usr/sbin/lvlnboot -R
12. Add the block device special file of the HP-UX (second) partition of the mirror to the file /stand/bootconf. The lower case "l" in the following command indicates that the disk is managed by LVM or VxVM.
# /usr/bin/echo "l /dev/dsk/c#t#d#s2" >> /stand/bootconf13. If desired, set the alternate boot path to the mirror_disk using the hardware path. Check step 6.
# /usr/sbin/setboot -a14. If the mirror disk includes an HPSP partition, use the efi_fsinit command on the character device file for the HPSP (third) partition to initialize it with an EFI file system.# /usr/sbin/setboot -h
# /usr/sbin/efi_fsinit -d /dev/rdsk/c#t#d#s3
Integrity 11i v3 (11.31) with persistent DSF
Mirroing boot disks on HP-UX 11i v 3 (11.31) Integrity system can been done using the Legacy device special files or the Persistent device special file implemented by the new Mass Storage Stack, also know as Agile View. This document section discuses the newer method.1. Identify an available disk to add to vg00.
# ioscan -funC disk
Class     I  H/W Path     Driver S/W State   H/W Type     Description
=====================================================================
disk      0  0/0/0/0.0.0  sdisk   CLAIMED     DEVICE       HP      Virtual LvDisk
                         /dev/dsk/c0t0d0     /dev/dsk/c0t0d0s2   /dev/rdsk/c0t0d0    /dev/rdsk/c0t0d0s2
                         /dev/dsk/c0t0d0s1   /dev/dsk/c0t0d0s3   /dev/rdsk/c0t0d0s1  /dev/rdsk/c0t0d0s3
disk      1  0/0/0/0.1.0  sdisk   CLAIMED     DEVICE       HP      Virtual LvDisk
                         /dev/dsk/c0t1d0   /dev/rdsk/c0t1d0
# ioscan -m dsf
Persistent DSF           Legacy DSF(s)
========================================
/dev/rdisk/disk18        /dev/rdsk/c0t1d0
/dev/rdisk/disk19_p1     /dev/rdsk/c0t0d0s1
/dev/rdisk/disk19_p2     /dev/rdsk/c0t0d0s2
/dev/rdisk/disk19_p3     /dev/rdsk/c0t0d0s3
# ioscan -N -fnkC disk
Class     I  H/W Path  Driver S/W State   H/W Type     Description
===================================================================
disk     18  64000/0xfa00/0x8  esdisk   CLAIMED     DEVICE       HP      Virtual LvDisk
                      /dev/disk/disk18   /dev/rdisk/disk#
disk     19  64000/0xfa00/0x9  esdisk   CLAIMED     DEVICE       HP      Virtual LvDisk
                      /dev/disk/disk19      /dev/disk/disk19_p2   /dev/rdisk/disk19     /dev/rdisk/disk19_p2
                      /dev/disk/disk19_p1   /dev/disk/disk19_p3   /dev/rdisk/disk19_p1  /dev/rdisk/disk19_p3
# ioscan -m hwpath
Lun H/W Path      Lunpath H/W Path                 Legacy H/W Path
====================================================================
64000/0xfa00/0x8
                  0/0/0/0.0x1.0x0                  0/0/0/0.1.0
64000/0xfa00/0x9
                  0/0/0/0.0x0.0x0                  0/0/0/0.0.0
2. Use the following commands to determine the size in megabytes of
the (1) EFI, and (3) HPSP partitions on the current boot disk.
# /usr/sbin/diskinfo -b /dev/rdisk/disk19_p1 \
| awk '{print $1 / (1024)}'
499.969
# /usr/sbin/diskinfo -b /dev/rdisk/disk19_p3 \
| awk '{print $1 / (1024)}'
400
3. Create an IPF partition description file to create the EFI and OS
partititions using your favorite method. Theses two example shows how to
create a IPF description file with an EFI partition of 500 Megabytes
and a HPSP partiiton of 400 Megabytes.
# print '3\nEFI 500MB\nHPUX 100%\nHPSP 400MB' > /tmp/idf4. Use idisk to perform the disk partitioning in the available drive using the file created above.
# idisk -wf /tmp/idf /dev/rdisk/disk#NOTE: There will be a prompt with a message saying the operation may be destructive and asks to continue. Answer yes for the operation to be successful. If the prompt is answered with only the 'y' character an error will be received along with a message user aborting.
Example:
idisk version: 1.43
********************** WARNING ***********************
If you continue you may destroy all data on this disk.
Do you wish to continue(yes/no)? yes

EFI Primary Header:
        Signature                 = EFI PART
        Revision                  = 0x10000
        HeaderSize                = 0x5c
        HeaderCRC32               = 0x5ca973b2
        MyLbaLo                   = 0x1
        AlternateLbaLo            = 0x3fffff
        FirstUsableLbaLo          = 0x40
        LastUsableLbaLo           = 0x3fffbf
        Disk GUID                 = f7cb4b9c-8f2d-11dc-8000-d6217b60e588
        PartitionEntryLbaLo       = 0x2
        NumberOfPartitionEntries  = 0xc
        SizeOfPartitionEntry      = 0x80
        PartitionEntryArrayCRC32  = 0x4ec7aafc

  Primary Partition Table (in 512 byte blocks):
    Partition 1 (EFI):
        Partition Type GUID       = c12a7328-f81f-11d2-ba4b-00a0c93ec93b
        Unique Partition GUID     = f7cb52cc-8f2d-11dc-8000-d6217b60e588
        Starting Lba              = 0x40
        Ending Lba                = 0xf9fff
    Partition 2 (HP-UX):
        Partition Type GUID       = 75894c1e-3aeb-11d3-b7c1-7b03a0000000
        Unique Partition GUID     = f7cb52f4-8f2d-11dc-8000-d6217b60e588
        Starting Lba              = 0xfa000
        Ending Lba                = 0x337fff
    Partition 3 (HPSP):
        Partition Type GUID       = e2a1e728-32e3-11d6-a682-7b03a0000000
        Unique Partition GUID     = f7cb5312-8f2d-11dc-8000-d6217b60e588
        Starting Lba              = 0x338000
        Ending Lba                = 0x3fffbf

EFI Alternate Header:
        Signature                 = EFI PART
        Revision                  = 0x10000
        HeaderSize                = 0x5c
        HeaderCRC32               = 0xfcc1ebde
        MyLbaLo                   = 0x3fffff
        AlternateLbaLo            = 0x1
        FirstUsableLbaLo          = 0x40
        LastUsableLbaLo           = 0x3fffbf
        Disk GUID                 = f7cb4b9c-8f2d-11dc-8000-d6217b60e588
        PartitionEntryLbaLo       = 0x3fffdf
        NumberOfPartitionEntries  = 0xc
        SizeOfPartitionEntry      = 0x80
        PartitionEntryArrayCRC32  = 0x4ec7aafc

  Alternate Partition Table (in 512 byte blocks):
    Partition 1 (EFI):
        Partition Type GUID       = c12a7328-f81f-11d2-ba4b-00a0c93ec93b
        Unique Partition GUID     = f7cb52cc-8f2d-11dc-8000-d6217b60e588
        Starting Lba              = 0x40
        Ending Lba                = 0xf9fff
    Partition 2 (HP-UX):
        Partition Type GUID       = 75894c1e-3aeb-11d3-b7c1-7b03a0000000
        Unique Partition GUID     = f7cb52f4-8f2d-11dc-8000-d6217b60e588
        Starting Lba              = 0xfa000
        Ending Lba                = 0x337fff
    Partition 3 (HPSP):
        Partition Type GUID       = e2a1e728-32e3-11d6-a682-7b03a0000000
        Unique Partition GUID     = f7cb5312-8f2d-11dc-8000-d6217b60e588
        Starting Lba              = 0x338000
        Ending Lba                = 0x3fffbf

Legacy MBR (MBR Signatures in little endian):
   MBR Signature = 0xd44acbf7

Protective MBR
5. Use the insf command to create device files for new EFI partitions. Use both the hardware path obtained from step 1.
# insf -e -H 0/0/0/0.1.0
insf: Installing special files for sdisk instance 1 address 0/0/0/0.1.0

# insf -e -H 64000/0xfa00/0x8
insf: Installing special files for esdisk instance 18 address 64000/0xfa00/0x8
6. Verified the newly create partition.
# ioscan -N -fnkC disk
Class     I  H/W Path  Driver S/W State   H/W Type     Description
===================================================================

disk     18  64000/0xfa00/0x8  esdisk   CLAIMED     DEVICE       HP      Virtual LvDisk
                      /dev/disk/disk#       /dev/disk/disk#_p2    /dev/rdisk/disk#      /dev/rdisk/disk#_p2
                      /dev/disk/disk18_p1   /dev/disk/disk18_p3   /dev/rdisk/disk18_p1  /dev/rdisk/disk#_p3
disk     19  64000/0xfa00/0x9  esdisk   CLAIMED     DEVICE       HP      Virtual LvDisk
                      /dev/disk/disk19      /dev/disk/disk19_p2   /dev/rdisk/disk19     /dev/rdisk/disk19_p2
                      /dev/disk/disk19_p1   /dev/disk/disk19_p3   /dev/rdisk/disk19_p1  /dev/rdisk/disk19_p3
# ioscan -fnkC disk
Class     I  H/W Path     Driver S/W State   H/W Type     Description
=====================================================================
disk      0  0/0/0/0.0.0  sdisk   CLAIMED     DEVICE       HP      Virtual LvDisk
                         /dev/dsk/c0t0d0     /dev/dsk/c0t0d0s2   /dev/rdsk/c0t0d0    /dev/rdsk/c0t0d0s2
                         /dev/dsk/c0t0d0s1   /dev/dsk/c0t0d0s3   /dev/rdsk/c0t0d0s1  /dev/rdsk/c0t0d0s3
disk      1  0/0/0/0.1.0  sdisk   CLAIMED     DEVICE       HP      Virtual LvDisk
                         /dev/dsk/c0t1d0     /dev/dsk/c0t1d0s2   /dev/rdsk/c0t1d0    /dev/rdsk/c0t1d0s2
                         /dev/dsk/c0t1d0s1   /dev/dsk/c0t1d0s3   /dev/rdsk/c0t1d0s1  /dev/rdsk/c0t1d0s3
7. Use mkboot to format and populate the newly created EFI partition:
# mkboot -e -l /dev/disk/disk#8. Change the AUTO file on both boot disks to hpux -lq so the host can boot without quorum if one mirror disk fails.
# print 'boot vmunix -lq' > /tmp/auto

# efi_cp -d /dev/disk/disk#_p1 /tmp/auto /EFI/HPUX/AUTO
9. Run the pvcreate command on the character device file for the HP-UX (second) partition of the mirror disk, using the "-B" flag to make the disk bootable, and the "-f" flag to overwrite any pre-existing data on the disk.
# pvcreate -f -B /dev/rdisk/disk#_p210. Extend the root volume group to the HP-UX partition of the mirror disk, using the block device file of the second (HPUX) partition.
# vgextend /dev/vg00 /dev/disk/disk#_p211. Starting with the boot, swap, and root logical volumes, run lvextend to mirror each logical volume:
# /usr/sbin/lvextend -m 1 /dev/vg00/lvol1 /dev/disk/disk#_p2
# /usr/sbin/lvextend -m 1 /dev/vg00/lvol2 /dev/disk/disk#_p2
# /usr/sbin/lvextend -m 1 /dev/vg00/lvol3 /dev/disk/disk#_p2
# /usr/sbin/lvextend -m 1 /dev/vg00/lvol# /dev/disk/disk#_p2
12. Run the following lvlnboot commands to reestablish LVM’s knowledge of the root and boot file systems and primary swap and dump.
# /usr/sbin/lvlnboot -b /dev/vg00/lvol1
# /usr/sbin/lvlnboot -r /dev/vg00/lvol3
# /usr/sbin/lvlnboot -s /dev/vg00/lvol2
# /usr/sbin/lvlnboot -d /dev/vg00/lvol2
# /usr/sbin/lvlnboot -R
13. Add the block device special file of the HP-UX (second) partition of the mirror to the file /stand/bootconf. The lower case "l" in the following command indicates that the disk is managed by LVM or VxVM.
# /usr/bin/echo "l /dev/disk/disk#_p2" >> /stand/bootconf14. If desired, set the alternate boot path to the mirror_disk using the Lunpath H/W Path. Check step 1.
# /usr/sbin/setboot -a 0/0/0/0.0x1.0x015. If the mirror disk includes an HPSP partition, use the efi_fsinit command on the character device file for the HPSP (third) partition to initialize it with an EFI file system.
# /usr/sbin/efi_fsinit -d /dev/rdisk/disk18_p3
Automating LVM mirroring
The following script can be use to automate LVM bootable volume mirroring on HP-UX 11i.#!/usr/bin/sh
#
# Script mk_mirror.sh adds $1 disk into vg00 if not already added
# and makes $1 mirror boot disk
# It comes with no support and HP makes no representations as to its
# fitness for purpose. It is up to whoever uses this program to ensure
# that whatever functionality it provides is what they require.
# (c) Wiki-UX.info (2010)
#
# Author: Andrew Miller
# Date: 2006.11.20
# Updated 2008.05.07: Alejandro Marin, support HP-UX 11.31 Agile Addressing,
# some command simplification and change of "if | then" style.
# Updated 2008.11.07: Alejandro Marin, correct boot auto file and mirror extensions,
# for Integrity. Add additional setboot information.
# Based on comments by Markus Vogt
# Updated 2009.07.28: Alejandro Marin, change Itanium AUTO file creation function
# to verify file creation instead of command execution (redundancyt)
# Based on comments by Markus Vogt
# Updated 2009.11.02: Alejandro Marin, change "print" to "printf" to create no-quorum AUTO boot file
# Based on comments by Alex Sandulak
#
#
# Script mk_mirror.sh basically execute.
# pvcreate -B /dev/rdsk/c#t#d# | /dev/rdisk/disk#
# mkboot /dev/rdsk/c#t#d# | /dev/rdisk/disk#
# mkboot -a "hpux (;0)/stand/vmunix" [ /dev/rdsk/c#t#d# | /dev/rdisk/disk# ]
# vgextend /dev/vg00 [ /dev/dsk/c#t#d# | /dev/disk/disk# ]
#
# for LV in $(vgdisplay -v vg00 | awk '/PV Name/ {print $3}')
# do
# lvextend -m 1 $LV [ /dev/dsk/c#t#d# | /dev/disk/disk# ]
# done
#
# lvlnboot -r $ROOTLV (typically lvol3)
# lvlnboot -s $SWAPLV (typically lvol2)
# lvlnboot -d $SWAPLV (typically lvol2)
# lvlnboot -b $BOOTLV (typically lvol1)
# lvlnboot -R /dev/vg00
# lvlnboot -v /dev/vg00
# Display setboot output and recommends "setboot -a
# EOF Script description
#set -x # xtrace: echo commands after command-line processing
#set -v # verbose: echo commands before executing them
#########################################################
# function _run_cmd
#########################################################
_run_cmd() {
CMD=$1
RET_VAL=0
print "\n$CMD"
print -n "\nRun above command? [y/n] "
read RUN_CMD
if [[ $RUN_CMD = y || $RUN_CMD = Y ]]; then
print "\nRunning command \"$CMD\"..."
$CMD
STAT=$?
if [[ $STAT -ne 0 ]]; then
print "\nERROR: command $CMD failed.\n"
RET_VAL=$STAT
fi
fi
return $RET_VAL
}
#########################################################
# End function _run_cmd
#########################################################
#########################################################
# MAIN Program
#########################################################
SCRIPT=$(basename $0)
# Test that the physical volume argument is provided
if [[ $1 = "" ]]; then
print "\nERROR: argument required, exiting."
print "\nUsage: script \"$SCRIPT disk (c#t#d#) | (disk#)\" - to make the disk bootable"
exit 1
fi
# Identified if system is running Itanium or PA-RISC Hardware
# arquitecture.
# HP Itanium is ia64, e.g., "ia64"
# HP PA-RISC is 9000/800 (server) or 9000/700 (workstation)
ARCH=$(uname -m)
if [[ $ARCH = "ia64" ]]; then
ITANIUM=true
else
ITANIUM=false
fi
# Identified if system is running HP-UX 11i v3 to enforce Agile View paths
# instead of legacy paths.
OSREL=$(uname -r)
if [[ $OSREL = "B.11.31" ]]; then
DISK=$1
DSK="/dev/disk/"$DISK
RDSK="/dev/rdisk/"$DISK
SUBFIX="_p"
else
DISK=$1
DSK=/dev/dsk/$DISK
RDSK=/dev/rdsk/$DISK
SUBFIX="s"
fi
# Verify DISK is a valid physical disk
DISKINFO=$(diskinfo $RDSK)
if [[ $DISKINFO = "" ]]
then
print "\nERROR: disk $DISK is not a valid physical disk (per diskinfo), exiting."
exit 1
fi
# Check to see if disk $DSK is already a member of vg00
IN_VG=$(vgdisplay -v vg00 | fgrep $DISK)
if [[ $IN_VG = "" ]]
then
print -n "\nDisk $DISK is not in vg00, add to vg00? [y/n] "
read ADD_TO_VG
if [[ $ADD_TO_VG = y || $ADD_TO_VGG = Y ]]
then
print "\nWill add disk $DISK to vg00 on $(uname -n) before being mirrored..."
fi
fi
if [[ $ITANIUM = true ]]; then
# Itanium ia64 models require idisk run first to create EFI and HPUX partitions
# mkboot options: -l for LVM, -e for EFI, boot files copied from /usr/lib/efi
print "\nDisplay first and last usable block for partitioning $DISK"
_run_cmd "idisk -b $RDSK"
# Create partition description file for idisk to read to create EFI and HPUX partitions
# Partitions:
# 1) EFI - EFI Partition, 11.23, changed from default 100 MB to 500 MB
# 2) HPUX - LVM Partition
# 3) HPSP - HP Service Partition (Offline diagnostics), 400 MB
print "3" > ia64disk.partition.$DISK
print "EFI 500MB" >> ia64disk.partition.$DISK
print "HPUX 100%" >> ia64disk.partition.$DISK
print "HPSP 400MB" >> ia64disk.partition.$DISK
print "\nCreate EFI and HPUX partitions on $RDSK"
_run_cmd "idisk -wf ia64disk.partition.$DISK $RDSK"
if [[ $RET_VAL -ne 0 ]]; then
exit 1
fi
# Create new device files for the EFI partitions
_run_cmd "insf -e"
if [[ $RET_VAL -ne 0 ]]; then
exit 1
fi
# Use mkboot to format and populate the newly created EFI partition
_run_cmd "mkboot -el ${DSK}"
# Change the AUTO file contents to enable boot with low-quorum enable
# System will start /dev/vg00 if either physical volume fails
printf "boot vmunix -lq\n" > auto.${DISK}
if [[ ! -f auto.$DISK ]]; then
print "Cannot find auto.$DISK file"
exit 1
fi
# Use correct dsf to EFI partition according to the OS release.
_run_cmd "efi_cp -d ${RDSK}${SUBFIX}1 auto.${DISK} /efi/hpux/auto"
if [[ $RET_VAL -ne 0 ]]; then
exit 1
fi
# Verify EFI partition info on $DISK
print "\nDisplay new EFI partition info written to $RDSK."
_run_cmd "idisk ${RDSK}"
# Itanium ia64 models require the right EFI partition number specified
# Use correct dsf to EFI partition according to the OS release.
_run_cmd "pvcreate -B ${RDSK}${SUBFIX}2"
if [[ $RET_VAL -ne 0 ]]; then
print "\nAbove pvcreate command failed: try to pvremove before pvcreate:"
_run_cmd "pvremove ${RDSK}${SUBFIX}2"
if [[ $RET_VAL -ne 0 ]]; then
exit 1
fi
_run_cmd "pvcreate -B ${RDSK}${SUBFIX}2"
if [[ $RET_VAL -ne 0 ]]; then
exit 1
fi
fi # End of Itanium section
else
# PA-RISC models require only pvcreate and mkboot without EFI partition numbers
# mkboot options: -l for LVM, boot files copied from /usr/lib/uxbootlf
# Correct Agile View / Legacy dsf is already configure on $DSK & $RDSK
_run_cmd "pvcreate -B ${RDSK}"
if [[ $RET_VAL -ne 0 ]]; then
print "\nAbove pvcreate command failed: try to pvremove before pvcreate:"
_run_cmd "pvremove ${RDSK}"
if [[ $RET_VAL -ne 0 ]]; then
exit 1
fi
_run_cmd "pvcreate -B $RDSK"
if [[ $RET_VAL -ne 0 ]]; then
exit 1
fi
fi
# Change the AUTO file contents to enable boot with low-quorum
# System will boot from other disk if either disk fails
# Automatically install LIF and AUTO boot string
print "\nInstallating LIF area and setting AUTO boot flag\n"
print "\"mkboot -l $DSK\""
print "\"mkboot -a \"hpux -lq (;0)/stand/vmunix\" $DSK\""
print -n "\nExecute above commands [y/n]? "
read RUN_CMD
if [[ $RUN_CMD = y || $RUN_CMD = Y ]]; then
mkboot -l $DSK
if [[ $? -ne 0 ]]; then
exit 1
fi
mkboot -a "hpux -lq (;0)/stand/vmunix" $DSK
if [[ $? -ne 0 ]]; then
exit 1
fi
fi
fi
if [[ $ITANIUM = true ]]; then
if [[ $ADD_TO_VG = y || $ADD_TO_VG = Y ]]; then
_run_cmd "vgextend /dev/vg00 ${DSK}${SUBFIX}2"
if [[ $RET_VAL -ne 0 ]]; then
exit 1
fi
fi
else # End of Itanium section
# Add disk $DSK to vg00 if it is not already
if [[ $ADD_TO_VG = y || $ADD_TO_VG = Y ]]; then
_run_cmd "vgextend /dev/vg00 ${DSK}"
if [[ $RET_VAL -ne 0 ]]; then
exit 1
fi
fi
fi
print "\nMirroring all lvols in vg00 now..."
print -n "Enter the number of mirror copies for lvextend command: "
read MIRROR_NUM
if [[ $MIRROR_NUM -ne 1 && $MIRROR_NUM -ne 2 ]]
then
print "ERROR: number of mirror copies $MIRROR_NUM must be either 1 or 2, exiting."
exit 1
fi
for LV in $(vgdisplay -v vg00 | awk '/LV Name/ {print $3}')
do
if [[ $ITANIUM = true ]]; then
print "\nMirroring lvol $LV on ${DSK}${SUBFIX}2..."
lvextend -m $MIRROR_NUM $LV ${DSK}${SUBFIX}2
else
print "\nMirroring lvol ${LV} on ${DSK}..."
lvextend -m $MIRROR_NUM ${LV} ${DSK}
fi
print "\nCompleted mirroring lvol ${LV} on ${DISK}"
done
# Set BDRA Boot definitions
ROOTLV=$(strings /etc/mnttab | awk '$2=="/" {print $1}')
SWAPLV=$(swapinfo | fgrep dev | awk '/dev/ {print $9}')
BOOTLV=$(strings /etc/mnttab | awk '$2=="/stand" {print $1}')
#lvlnboot -r /dev/vg00/lvol3
lvlnboot -r ${ROOTLV}
#lvlnboot -s /dev/vg00/lvol2
lvlnboot -s ${SWAPLV}
#lvlnboot -d /dev/vg00/lvol2
lvlnboot -d ${SWAPLV}
#lvlnboot -b /dev/vg00/lvol1
lvlnboot -b ${BOOTLV}
lvlnboot -R /dev/vg00
lvlnboot -v /dev/vg00
print "Boot Definitions for Volume Group /dev/vg00:"
lvlnboot -v
print "\nRecommend setting $DISK as Alternate boot disk \"setboot -a
print "\nRecommend setting $DISK as High Availability disk \"setboot -h
print "\nif supported on your platform.\n"
print "Current setboot definitions:\n"
setboot
print "\nRecommend setting AUTO boot flags to add the \"-l q\" option on your primary disk"
print "\nThe script only set the low-quorum option on the alternate boot."
# If the mirror disk includes an HPSP partition, use the efi_fsinit
# command on the character device file for the HPSP (third) partition
# to initialize it with an EFI file system.
if [[ $ITANIUM = true ]]; then
_run_cmd "efi_fsinit -d ${RDSK}${SUBFIX}3"
fi
print "\nMirrored lvols in vg00 is now completed:\n"
for LV in $(vgdisplay -v vg00 | awk '/LV Name/ {print $3}')
do
print "$LV: $(lvdisplay -v $LV | fgrep Mirror)"
done
print "\nEnd of script $SCRIPT."
# EOF mk_mirror.sh
Troubleshooting
HP 9000
Use the following procedure to verify the current state of boot data your primary and alternate boot disks.1. Check that alternate boot path correspond to alternate boot disk
# ioscan -fnkC disk
# setboot
2. Check LVM boot pointers.
# lvlnboot -v3. Check that LIF area exits and is populated on the alternate boot disk. Replace c#t#d# with the "dsf" of your alternave boot disk.
# lifls /dev/dsk/c#t#d#4. Check the AUTO boot flag.
# lifcp /dev/dsk/c#t#d#:AUTO -5. Check that /stand/bootconf contains both boot disks.
# cat /stand/bootconf
Integrity
Monitor volume group syncronization
If you need to monitor the advance of the volume group sincronization, you can use this script to quickly monitor extends that are still "stale". Running this command should give a lower value each iteration until it reachs zero.while true do for lv in $(vgdisplay -vExample:| grep "LV Name" | awk '{print $3}') do lvdisplay -v $lv done | grep -i stale | wc -l sleep 10 done
# while true
> do
> for lv in $(vgdisplay -v vg00 | grep "LV Name" | awk '{print $3}')
> do
> lvdisplay -v $lv
> done | grep -i stale | wc -ldone | grep -i stale | wc -l
> sleep 10
> done
5
0
Reference
- Managing Mirrored File Systems
- Dynamic Root Disk and MirrorDisk/UX
- HP-UX 11i v3 Persistent DSF Migration Guide
- LVM Migration from Legacy to Agile Naming Model HP-UX 11i v3
- The Next Generation Mass Storage Stack
- HP-UX 11i Version 3: HP-UX System Administrator's Guide: Logical Volume Management HP 9000 and HP Integrity Systems (page 155)
- Mirroring a Boot Disk with LVM on HP-UX 11i for HP Integrity Servers (HP-UX 11.23)
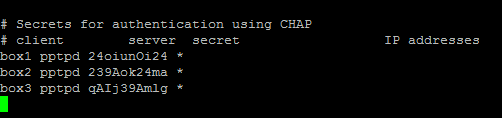 Where client is the username, server is type of service – pptpd for
our example, secret is the password, and IP addresses specifies which IP
address may authenticate.
By setting ‘*’ in IP addresses field, you specify that you would accept
username/password pair for any IP.
Where client is the username, server is type of service – pptpd for
our example, secret is the password, and IP addresses specifies which IP
address may authenticate.
By setting ‘*’ in IP addresses field, you specify that you would accept
username/password pair for any IP.