Tuesday, September 23, 2014

How to Setup and Configure an OpenVPN Server on CentOS 6

One of the commonly asked questions from our users is how to add another IP address to their server. You can assign your own private IP address to your droplet by creating a VPN tunnel. Whether you want to build your own Virtual Private Network (VPN), or assign an SSL certificate to that IP address, you have several options. From all of the possible options, the most optimal ones are between PPTP and OpenVPN. A Point-To-Point Tunneling Protocol (PPTP) allows you to implement your own VPN very quickly, and is compatible with most mobile devices. Even though PPTP is less secure than OpenVPN, it is also faster and uses less CPU resources.

Step 1 - PPTP Installation

You will have to select one server to be responsible for handling out IPs to others and authenticating all of your servers into your VPN. This will become your PPTP Server.
On CentOS 6 x64:
rpm -i http://poptop.sourceforge.net/yum/stable/rhel6/pptp-release-current.noarch.rpm
yum -y install pptpd
On Ubuntu 12.10 x64:
apt-get install pptpd
Now you should edit /etc/pptpd.conf and add the following lines:
localip 10.0.0.1
remoteip 10.0.0.100-200
Where localip is IP address of your server and remoteip are IPs that will be assigned to clients that connect to it.
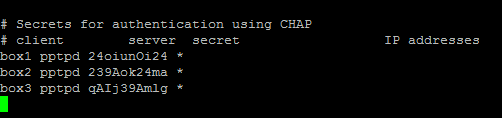
Next, you should setup authentication for PPTP by adding users and passwords. Simply add them to /etc/ppp/chap-secrets : Where client is the username, server is type of service – pptpd for our example, secret is the password, and IP addresses specifies which IP address may authenticate. By setting ‘*’ in IP addresses field, you specify that you would accept username/password pair for any IP.

Step 2 - Add DNS servers to /etc/ppp/pptpd-options

ms-dns 8.8.8.8
ms-dns 8.8.4.4
Now you can start PPTP daemon:
service pptpd restart
Verify that it is running and accepting connections:

Step 3 - Setup Forwarding

It is important to enable IP forwarding on your PPTP server. This will allow you to forward packets between public IP and private IPs that you setup with PPTP. Simply edit /etc/sysctl.conf and add the following line if it doesn’t exist there already:
net.ipv4.ip_forward = 1
To make changes active, run sysctl -p

Step 4 - Create a NAT rule for iptables

iptables -t nat -A POSTROUTING -o eth0 -j MASQUERADE && iptables-save
If you would also like your PPTP clients to talk to each other, add the following iptables rules:
iptables --table nat --append POSTROUTING --out-interface ppp0 -j MASQUERADE
iptables -I INPUT -s 10.0.0.0/8 -i ppp0 -j ACCEPT
iptables --append FORWARD --in-interface eth0 -j ACCEPT
Now your PPTP server also acts as a router.
If you would like to restrict which servers can connect to your droplets, you can setup an iptables rule that restricts TCP connects to port 1723.

Monday, September 8, 2014

Zimbra reports “ Error: Queue report unavailable – mail system is down ”

During update from one version to another or sometimes when you reboot Zimbra you can get following error:  "Error: Queue report unavailable - mail system is down".
We can find that it does not starts correctly the service postfix MTA. But the system shows that everything is working properly:
zcs @ zimbra: ~ $ zmcontrol status
Host zcs.ilba.cat
        antispam                Running
        antivirus               Running
        convertd                Running
        ldap                    Running
        LOGGER Running
        mailbox                 Running
        mta                     Running
        opendkim                Running
        proxy                   Running
        snmp                    Running
        spell                   Running
        stats                   Running
        zmconfigd               Running
We reviewed logs and services and we see that the MTA is down:
zimbra@zcs:~$ tail -f /var/log/mail.log
Jan 22 11:08:00 zcs postfix/postqueue[19195]: fatal: Queue report unavailable - mail system is down

zimbra @ zcs: ~ $ netstat -nlpt | grep 25
(Not all processes could be identified, non-owned process info
 will not be shown, you would have to be root to see it all.)
tcp        0      0 0.0.0.0:7025            0.0.0.0:*               LISTEN      -
We proceed to restart the service postfix hand, indicates that it has raised correctly, but does not work:
Zimbra ZCS @: ~ $ / opt / Zimbra / bin / zmmtactl stop
/postfix-script: fatal: the Postfix mail system is not running
Stopping saslauthd...done.

Zimbra ZCS @: ~ $ / opt / Zimbra / bin / zmmtactl start
Rewriting configuration files...done.
Starting saslauthd...done.

zimbra @ zcs: ~ $ netstat -nlpt | grep 25
(Not all processes could be identified, non-owned process info
 will not be shown, you would have to be root to see it all.)
tcp        0      0 0.0.0.0:7025            0.0.0.0:*               LISTEN      -
The problem is that there is master.pid file, which tells the postfix that is raised, but it really is not raised. We looked:
root@zcs:~# locate master.pid
/opt/zimbra/data/postfix/spool/pid/master.pid
And delete it or rename it and then restart the MTA:
zcs root @: ~ # mv /opt/zimbra/data/postfix/spool/pid/master.pid /opt/zimbra/data/postfix/spool/pid/master.pid.ori

root@zcs:~# su - zimbra

Zimbra ZCS @: ~ $ / opt / Zimbra / bin / zmmtactl start
Rewriting configuration files...done.
Starting saslauthd...already running.
/postfix-script: starting the Postfix mail system

Sunday, August 17, 2014

Rename a Linux MD Device


Often it may be necessary to change the name of an MD device in Linux. For example, say you are migrating from one RAID array to another. At one point you may have both arrays active, the old and the new. In the end you may wish to remove the old array and just have the new, but reuse the name as the old array.
In this example, md3 is the old array and md4 was created to be the new array. We’ve moved the data over to md4 already and now we want to rename md4 to be md3 from this point forward.
First, remove md3 completely (after dismounting the filesystem):
1
2
mdadm --stop /dev/md3
mdadm --remove /dev/md3
Next, dismount the new array (md4) and reassemble as md3:
3
4
mdadm --stop /dev/md4
mdadm --assemble /dev/md3 /dev/sd[abcdefghijk]1 --update=name
The magic here is “–update=name” which tells mdadm to update the superblocks which previously contained the name md4 with the new name you have specified.

Backup /etc/mdadm.conf and then update it with new info: 
mdadm --examine --scan > /etc/mdadm.conf

Check detailed status of raid:
mdadm --detail /dev/md3

Update /etc/fstab to point to correct disk and mount point

Another good example can be found on: http://www.cyberciti.biz/faq/linux-server-rename-an-mdadm-raid-array/

Thursday, August 14, 2014

Mikrotik - Bruteforce login prevention

To stop SSH/FTP attacks on your router, follow this advice. This configuration allows only 10 FTP login incorrect answers per minute
in /ip firewall filter
add chain=input protocol=tcp dst-port=21 src-address-list=ftp_blacklist action=drop \
comment="drop ftp brute forcers"

add chain=output action=accept protocol=tcp content="530 Login incorrect" dst-limit=1/1m,9,dst-address/1m

add chain=output action=add-dst-to-address-list protocol=tcp content="530 Login incorrect" \
address-list=ftp_blacklist address-list-timeout=3h

This will prevent a SSH brute forcer to be banned for 10 days after repetitive attempts. Change the timeouts as necessary.

in /ip firewall filter
add chain=input protocol=tcp dst-port=22 src-address-list=ssh_blacklist action=drop \
comment="drop ssh brute forcers" disabled=no

add chain=input protocol=tcp dst-port=22 connection-state=new \
src-address-list=ssh_stage3 action=add-src-to-address-list address-list=ssh_blacklist \
address-list-timeout=10d comment="" disabled=no

add chain=input protocol=tcp dst-port=22 connection-state=new \
src-address-list=ssh_stage2 action=add-src-to-address-list address-list=ssh_stage3 \
address-list-timeout=1m comment="" disabled=no

add chain=input protocol=tcp dst-port=22 connection-state=new src-address-list=ssh_stage1 \
action=add-src-to-address-list address-list=ssh_stage2 address-list-timeout=1m comment="" disabled=no

add chain=input protocol=tcp dst-port=22 connection-state=new action=add-src-to-address-list \
address-list=ssh_stage1 address-list-timeout=1m comment="" disabled=no
If you want to block downstream access as well, you need to block the with the forward chain:
add chain=forward protocol=tcp dst-port=22 src-address-list=ssh_blacklist action=drop \
comment="drop ssh brute downstream" disabled=no
To view the contents of your Blacklist, go to "/ip firewall address-list" and type "print" to see the contents.

Monday, April 7, 2014

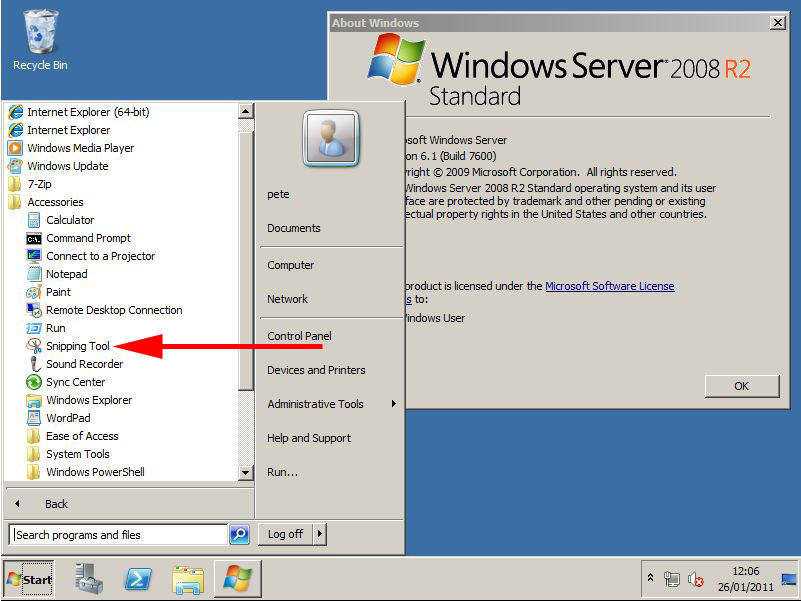
Server 2008 R2 Enable the "Snipping Tool"

KB ID 0000383 Dtd 26/01/11

Problem

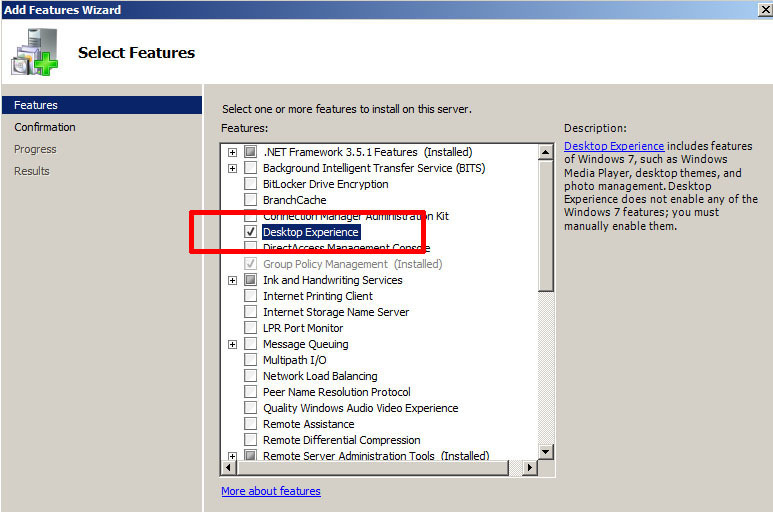
The Windows Snipping Tool is not in the default build of Server 2008 R2, it's part of the "Desktop Experience" feature.
In addition to SnippingTool.exe, this feature also enables, Windows Media Player, Desktop themes, Video for Windows (AVI support), Windows SideShow, Windows Defender, Disk Cleanup, Sync Center,Sound Recorder, Character Map, and the Windows Disc Image Burner.

Solution

Warning before you do this, when completed the server will reboot a few times as it configures the features, and pulls down updates. Plan in some downtime to carry out this procedure.
1. On the server > Open server Manager (ServerManager.msc) > Expand Feature > Add Features > Locate the Desktop Experience and select it.
Desktop Experience
2. When finished it will ask for a reboot, then reboot (quite a lot - I was worried it was in a reboot loop at one point).
3. When it comes back there's your snipping tool.
2008 Snipping Tool

Friday, March 21, 2014

How to Clone/Backup Linux Systems Using – Mondo Rescue Disaster Recovery Tool

Here is very good HOW-TO regarding backup of Linux System. I am puting here just in case it is lost on original site http://www.tecmint.com/how-to-clone-linux-systems/ 

Mondo Rescue
is an open source, free disaster recovery and backup utility that allows you to easily create complete system (Linux or Windows) Clone/Backup ISO Images to CD, DVD, Tape, USB devices, Hard Disk, and NFS. And can be used to quickly restore or redeploy working image into other systems, in the event of data loss, you will be able to restore as much as entire system data from backup media.
Mondo program is available freely for download and released under GPL (GNU Public License) and has been tested on a large number of Linux distributions.
This article describes Mondo installation and usage of Mondo Tools to backup of your entire systems. The Mondo Rescue is a Disaster Recovery and Backup Solutions for System Administrators to take full backup of their Linux and Windows file system partitions into CD/DVD, Tape, NFS and restore them with the help of Mondo Restore media feature that uses at boot-time.

Installing MondoRescue on RHEL / CentOS / Scientific Linux

The latest Mondo Rescue packages (current version of Mondo is 3.0.3-1) can be obtained from the “MondoRescue Repository“. Use “wget” command to download and add repository under your system. The Mondo repository will install suitable binary software packages such as afio, buffer, mindi, mindi-busybox, mondo and mondo-doc for your distribution, if they are available.

For RHEL/CentOS/SL 6,5,4 – 32-Bit

Download the MondoRescue repository under “/etc/yum.repos.d/” as file name “mondorescue.repo“. Please download correct repository for your Linux OS distribution version.
# cd /etc/yum.repos.d/

## On RHEL/CentOS/SL 6 - 32-Bit ##
# wget ftp://ftp.mondorescue.org/rhel/6/i386/mondorescue.repo

## On RHEL/CentOS/SL 5 - 32-Bit ##
# wget ftp://ftp.mondorescue.org/rhel/5/i386/mondorescue.repo

## On RHEL/CentOS/SL 4 - 32-Bit ##
# wget ftp://ftp.mondorescue.org/rhel/4/i386/mondorescue.repo

For RHEL/CentOS/SL 6,5,4 – 64-Bit

# cd /etc/yum.repos.d/

## On RHEL/CentOS/SL 6 - 64-Bit ##
# wget ftp://ftp.mondorescue.org/rhel/6/x86_64/mondorescue.repo

## On RHEL/CentOS/SL 5 - 64-Bit ##
# wget ftp://ftp.mondorescue.org/rhel/5/x86_64/mondorescue.repo

## On RHEL/CentOS/SL 4 - 64-Bit ##
# wget ftp://ftp.mondorescue.org/rhel/4/x86_64/mondorescue.repo
Once you successfully added repository, do “yum” to install latest Mondo tool.
# yum install mondo

Installing MondoRescue on Debian / Ubuntu / Linux Mint

Debian user’s can do “wget” to grab the MondoRescue repository for Debain 6 and 5 distributions. Run the following command to add “mondorescue.sources.list” to “/etc/apt/sources.list” file to install Mondo packages.

On Debian

## On Debian 6 ##
# wget ftp://ftp.mondorescue.org/debian/6/mondorescue.sources.list
# sh -c "cat mondorescue.sources.list >> /etc/apt/sources.list" 
# apt-get update 
# apt-get install mondo
## On Debian 5 ##
# wget ftp://ftp.mondorescue.org/debian/5/mondorescue.sources.list
# sh -c "cat mondorescue.sources.list >> /etc/apt/sources.list" 
# apt-get update 
# apt-get install mondo

On Ubuntu/Linux Mint

To install Mondo Rescue in Ubuntu 12.10, 12.04, 11.10, 11.04, 10.10 and 10.04 or Linux Mint 13, open the terminal and add the MondoRescue repository in “/etc/apt/sources.list” file. Run these following commands to install Mondo Resuce packages.
# wget ftp://ftp.mondorescue.org/ubuntu/`lsb_release -r|awk '{print $2}'`/mondorescue.sources.list
# sh -c "cat mondorescue.sources.list >> /etc/apt/sources.list" 
# apt-get update 
# apt-get install mondo

Creating Cloning or Backup ISO Image of System/Server

After installing Mondo, Run “mondoarchive” command as “root” user. Then follow screenshots that shows how to create an ISO based backup media of your full system.
# mondoarchive
Welcome to Mondo Rescue
Mondo Rescue Welcome Screen

Mondo Rescue Welcome Screen

Please enter the full path name to the directory for your ISO Images. For example: /mnt/backup/
Mondo Rescue Storage Directory

Mondo Rescue Storage Directory
Select Type of compression. For example: bzip, gzip or lzo.
Select Type of Compression

Select Type of Compression
Select the maximum compression option.
Mondo Rescue Compression Speed

Select Compression Speed
Please enter how large you want each ISO image in MB (Megabytes). This should be less than or equal to the size of the CD-R(W)’s (i.e. 700) and for DVD’s (i.e. 4480).
Mondo Rescue ISO Size

Define Mondo Rescue ISO Size
Please give a name of your ISO image filename. For example: tecmint1 to obtain tecmint-[1-9]*.iso files.
Mondo Rescue Prefix

Enter Name of Mondo Rescue
Please add the filesystems to backup (separated by “|“). The default filesystem is “/” means full backup.
Mondo Rescue Backup Paths

Enter Backup Paths
Please exclude the filesystem that you don’t want to backup (separated by “|“). For example: “/tmp” and “/proc” are always excluded or if you want full backup of your system, just hit enter.
Mondo Rescue Exclude Paths

Enter Exclude File System
Please enter your temporary directory path or select default one.
Mondo Rescue Temporary  Directory

Enter Temporary Directory Name
Please enter your scratch directory path or select default one.
Mondo Rescue Scratch  Directory Name

Enter Scratch Directory Name
If you would like to backup extended attributes. Just hit “enter“.
Mondo Rescue Extended Backup

Enter Extended Backup Attributes
If you want to Verify your backup, after mondo has created them. Click “Yes“.
Mondo Rescue Verify Backups

Verify Backups
If you’re using stable standalone Linux Kernel, click “Yes” or if you using other Kernel say “Gentoo” or “Debain” hit “No“.
Mondo Rescue Kernel

Select Stable Linux Kernel
Click “Yes” to proceed further.
Mondo Rescue Backup Process

Proceed Cloning Process
Creating a catalog of “/” filesystem.
Mondo Rescue Making Catalog

Creating Catalog for File System
Dividing filelist into sets.
Mondo Rescue Dividing File List

Dividing File List
Calling MINDI to create boot+data disk.
Mondo Rescue Boot Data Disk

Creating Boot Data Disk
Backing up filesytem. It may take a couple of hours, please be patient.
Mondo Rescue Backup Filesystem

Backing up File System
Backing up big files.
Mondo Rescue Big Files Backup

Big Files Backup
Running “mkisofs” to make ISO Image.
Mondo Rescue Creating ISO

Making ISO Image
Verifying ISO Image tarballs.
Mondo Rescue Verify ISO

Verify ISO
Verifying ISO Image Big files.
Mondo Rescue Verify Big Files

Verify Big Files
Finally, Mondo Archive has completed. Please hit “Enter” to back to the shell prompt.
Mondo Rescue Backup Completed

Backup Completed
If you’ve selected default backup path, you will see an ISO image under “/var/cache/mondo/“, that you can burnt into a CD/DVD for later restore.
To restore all files automatically, boot the system with Mondo ISO Image and at boot prompt type “nuke” to restore files. Here is the detailed video that demonstrates how to restore files automatically from CD/DVD media.


For other distributions, you can also grab Mondo Rescue packages at mondorescue.org download page.

Monday, March 10, 2014

Installing Pure-FTPd on Centos and creating virtual users

FTP virtual user is a user that can upload file on behalf of system user. For example you have a OS user “pradono” and the home directory is /home/pradono, a virtual user “test1″ that is setup on behalf of “pradono”, can upload file to /home/pradono/test1 and the file uploaded will have the ownership as “pradono”.

1. Installing Pure-FTPd using yum

Let’s start by adding an additional CentOS repo
[root@prod1 ~]# cd /etc/yum.repos.d/
[root@prod1 /etc/yum.repos.d]# wget http://centos.karan.org/kbsingh-CentOS-Extras.repo
And enable kbs-CentOS-Testing by editing /etc/yum.repos.d/kbsingh-CentOS-Extras.repo
[root@prod1 /etc/yum.repos.d]# nano -w kbsingh-CentOS-Extras.repo
Change enabled=0 to enabled=1
[...]
[kbs-CentOS-Testing]
name=CentOS.Karan.Org-EL$releasever - Testing
gpgcheck=0
enabled=1
baseurl=http://centos.karan.org/el$releasever/extras/testing/$basearch/RPMS/
Import the repo key
[root@prod1 /etc/yum.repos.d]# rpm --import http://centos.karan.org/RPM-GPG-KEY-karan.org.txt
Install pure-ftpd.
[root@prod1 /etc/yum.repos.d]# yum -y install pure-ftpd

2. Edit the Pure-FTPd config file

[root@prod1 /etc/yum.repos.d]# cd /etc/pure-ftpd/
[root@prod1 /etc/pure-ftpd]# nano -w pure-ftpd.conf
Make sure you have these options enabled
[...]
# If you want simple Unix (/etc/passwd) authentication, uncomment this
UnixAuthentication yes
# If you want to log all client commands, set this to "yes".
# This directive can be duplicated to also log server responses.
VerboseLog yes
# PureDB user database (see README.Virtual-Users)
PureDB /etc/pure-ftpd/pureftpd.pdb
# Automatically create home directories if they are missing
CreateHomeDir yes
The CreateHomeDir option makes adding virtual users more easy by creating a user’s home directory upon login (if it doesn’t already exist).

3. Import OS users to Pure-FTPd FTP Users (Optional)

We can either import users with system-level accounts (defined in /etc/passwd) at once or create new users manually using pure-pw useradd. To import users that already exist on your system into the virtual user database, enter these commands:
The name has to be pureftpd.passwd. This creates pureftpd.passwd file.
pure-pw mkdb imports pureftpd.passwd to the puredb file, in this example /etc/pure-ftpd/pureftpd.pdb.
[root@prod1 /etc/pure-ftpd]# pure-pwconvert >> pureftpd.passwd
[root@prod1 /etc/pure-ftpd]# pure-pw mkdb
Update: Just use UnixAuthentication yes in your pure-ftpd.conf file and you don’t need step 3 above.

4. Add a virtual user.

This adds a virtual user “test” to pureftpd.pass file
[root@prod1 /etc/pure-ftpd]# pure-pw useradd test -u doniking -g doniking -d /home/doniking/test
Password:
Again, this imports the updated pureftpd.passwd file into a puredb file.
[root@prod1 /etc/pure-ftpd]# pure-pw mkdb

5. Testing.

We haven’t restarted pure-ftpd service yet until now. Let’s restart it.
[root@prod1 /etc/pure-ftpd]# service pure-ftpd restart
Stopping pure-ftpd: [ OK ]
Starting pure-ftpd: [ OK ]
Test the user
[root@prod1 /etc/pure-ftpd]# ftp localhost
Connected to doniking.lan.
220---------- Welcome to Pure-FTPd [privsep] [TLS] ----------
220-You are user number 2 of 50 allowed.
220-Local time is now 00:47. Server port: 21.
220-IPv6 connections are also welcome on this server.
220 You will be disconnected after 15 minutes of inactivity.
500 This security scheme is not implemented
KERBEROS_V4 rejected as an authentication type
Name (localhost:root): test
331 User test OK. Password required
Password:
230-User test has group access to: 500
230 OK. Current directory is /
Remote system type is UNIX.
Using binary mode to transfer files.
ftp>

6. Notes.

- Every time you add a virtual user, run
[root@prod1 /etc/pure-ftpd]# pure-pw mkdb
to import pureftpd.passwd to pureftpd.pdb.
- If you want to enable the OS users to ftp, you don’t need to use pure-pwconvert command as others suggest. Simply enable
UnixAuthentication yes
in your /etc/pure-ftpd/pure-ftpd.conf config file.

How to use DiskSpd to simulate Veeam Backup & Replication disk actions

This HOW-TO contains information on how to use Microsoft© DiskSpd to simulate Veeam Backup & Replication disk actions to measure disk pe...