Monday, April 7, 2014

Server 2008 R2 Enable the "Snipping Tool"

KB ID 0000383 Dtd 26/01/11

Problem

The Windows Snipping Tool is not in the default build of Server 2008 R2, it's part of the "Desktop Experience" feature.
In addition to SnippingTool.exe, this feature also enables, Windows Media Player, Desktop themes, Video for Windows (AVI support), Windows SideShow, Windows Defender, Disk Cleanup, Sync Center,Sound Recorder, Character Map, and the Windows Disc Image Burner.

Solution

Warning before you do this, when completed the server will reboot a few times as it configures the features, and pulls down updates. Plan in some downtime to carry out this procedure.
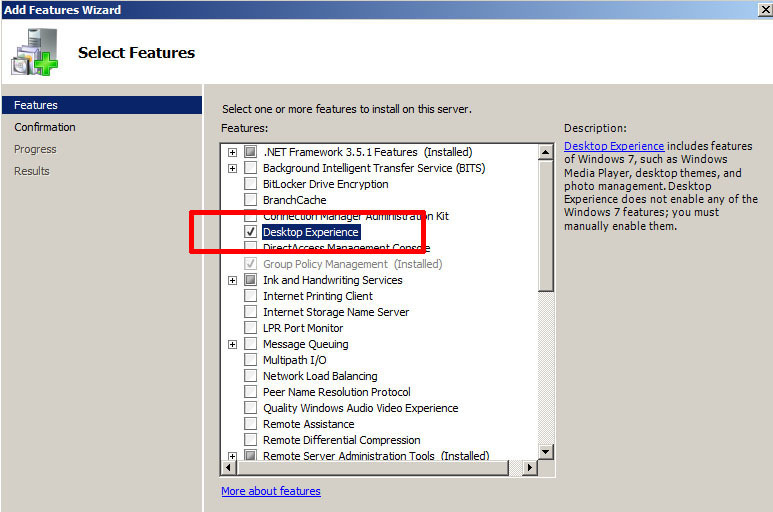
1. On the server > Open server Manager (ServerManager.msc) > Expand Feature > Add Features > Locate the Desktop Experience and select it.
Desktop Experience
2. When finished it will ask for a reboot, then reboot (quite a lot - I was worried it was in a reboot loop at one point).
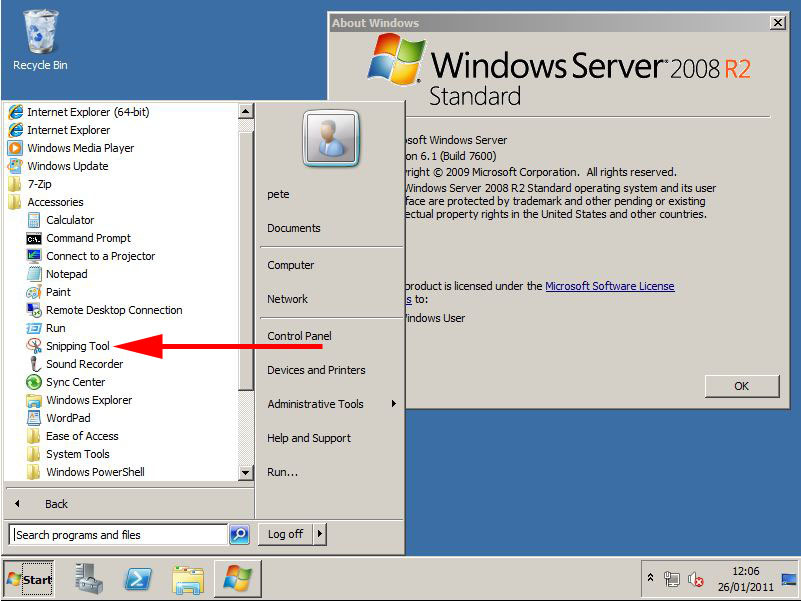
3. When it comes back there's your snipping tool.
2008 Snipping Tool

Friday, March 21, 2014

How to Clone/Backup Linux Systems Using – Mondo Rescue Disaster Recovery Tool

Here is very good HOW-TO regarding backup of Linux System. I am puting here just in case it is lost on original site http://www.tecmint.com/how-to-clone-linux-systems/ 

Mondo Rescue
is an open source, free disaster recovery and backup utility that allows you to easily create complete system (Linux or Windows) Clone/Backup ISO Images to CD, DVD, Tape, USB devices, Hard Disk, and NFS. And can be used to quickly restore or redeploy working image into other systems, in the event of data loss, you will be able to restore as much as entire system data from backup media.
Mondo program is available freely for download and released under GPL (GNU Public License) and has been tested on a large number of Linux distributions.
This article describes Mondo installation and usage of Mondo Tools to backup of your entire systems. The Mondo Rescue is a Disaster Recovery and Backup Solutions for System Administrators to take full backup of their Linux and Windows file system partitions into CD/DVD, Tape, NFS and restore them with the help of Mondo Restore media feature that uses at boot-time.

Installing MondoRescue on RHEL / CentOS / Scientific Linux

The latest Mondo Rescue packages (current version of Mondo is 3.0.3-1) can be obtained from the “MondoRescue Repository“. Use “wget” command to download and add repository under your system. The Mondo repository will install suitable binary software packages such as afio, buffer, mindi, mindi-busybox, mondo and mondo-doc for your distribution, if they are available.

For RHEL/CentOS/SL 6,5,4 – 32-Bit

Download the MondoRescue repository under “/etc/yum.repos.d/” as file name “mondorescue.repo“. Please download correct repository for your Linux OS distribution version.
# cd /etc/yum.repos.d/

## On RHEL/CentOS/SL 6 - 32-Bit ##
# wget ftp://ftp.mondorescue.org/rhel/6/i386/mondorescue.repo

## On RHEL/CentOS/SL 5 - 32-Bit ##
# wget ftp://ftp.mondorescue.org/rhel/5/i386/mondorescue.repo

## On RHEL/CentOS/SL 4 - 32-Bit ##
# wget ftp://ftp.mondorescue.org/rhel/4/i386/mondorescue.repo

For RHEL/CentOS/SL 6,5,4 – 64-Bit

# cd /etc/yum.repos.d/

## On RHEL/CentOS/SL 6 - 64-Bit ##
# wget ftp://ftp.mondorescue.org/rhel/6/x86_64/mondorescue.repo

## On RHEL/CentOS/SL 5 - 64-Bit ##
# wget ftp://ftp.mondorescue.org/rhel/5/x86_64/mondorescue.repo

## On RHEL/CentOS/SL 4 - 64-Bit ##
# wget ftp://ftp.mondorescue.org/rhel/4/x86_64/mondorescue.repo
Once you successfully added repository, do “yum” to install latest Mondo tool.
# yum install mondo

Installing MondoRescue on Debian / Ubuntu / Linux Mint

Debian user’s can do “wget” to grab the MondoRescue repository for Debain 6 and 5 distributions. Run the following command to add “mondorescue.sources.list” to “/etc/apt/sources.list” file to install Mondo packages.

On Debian

## On Debian 6 ##
# wget ftp://ftp.mondorescue.org/debian/6/mondorescue.sources.list
# sh -c "cat mondorescue.sources.list >> /etc/apt/sources.list" 
# apt-get update 
# apt-get install mondo
## On Debian 5 ##
# wget ftp://ftp.mondorescue.org/debian/5/mondorescue.sources.list
# sh -c "cat mondorescue.sources.list >> /etc/apt/sources.list" 
# apt-get update 
# apt-get install mondo

On Ubuntu/Linux Mint

To install Mondo Rescue in Ubuntu 12.10, 12.04, 11.10, 11.04, 10.10 and 10.04 or Linux Mint 13, open the terminal and add the MondoRescue repository in “/etc/apt/sources.list” file. Run these following commands to install Mondo Resuce packages.
# wget ftp://ftp.mondorescue.org/ubuntu/`lsb_release -r|awk '{print $2}'`/mondorescue.sources.list
# sh -c "cat mondorescue.sources.list >> /etc/apt/sources.list" 
# apt-get update 
# apt-get install mondo

Creating Cloning or Backup ISO Image of System/Server

After installing Mondo, Run “mondoarchive” command as “root” user. Then follow screenshots that shows how to create an ISO based backup media of your full system.
# mondoarchive
Welcome to Mondo Rescue
Mondo Rescue Welcome Screen

Mondo Rescue Welcome Screen

Please enter the full path name to the directory for your ISO Images. For example: /mnt/backup/
Mondo Rescue Storage Directory

Mondo Rescue Storage Directory
Select Type of compression. For example: bzip, gzip or lzo.
Select Type of Compression

Select Type of Compression
Select the maximum compression option.
Mondo Rescue Compression Speed

Select Compression Speed
Please enter how large you want each ISO image in MB (Megabytes). This should be less than or equal to the size of the CD-R(W)’s (i.e. 700) and for DVD’s (i.e. 4480).
Mondo Rescue ISO Size

Define Mondo Rescue ISO Size
Please give a name of your ISO image filename. For example: tecmint1 to obtain tecmint-[1-9]*.iso files.
Mondo Rescue Prefix

Enter Name of Mondo Rescue
Please add the filesystems to backup (separated by “|“). The default filesystem is “/” means full backup.
Mondo Rescue Backup Paths

Enter Backup Paths
Please exclude the filesystem that you don’t want to backup (separated by “|“). For example: “/tmp” and “/proc” are always excluded or if you want full backup of your system, just hit enter.
Mondo Rescue Exclude Paths

Enter Exclude File System
Please enter your temporary directory path or select default one.
Mondo Rescue Temporary  Directory

Enter Temporary Directory Name
Please enter your scratch directory path or select default one.
Mondo Rescue Scratch  Directory Name

Enter Scratch Directory Name
If you would like to backup extended attributes. Just hit “enter“.
Mondo Rescue Extended Backup

Enter Extended Backup Attributes
If you want to Verify your backup, after mondo has created them. Click “Yes“.
Mondo Rescue Verify Backups

Verify Backups
If you’re using stable standalone Linux Kernel, click “Yes” or if you using other Kernel say “Gentoo” or “Debain” hit “No“.
Mondo Rescue Kernel

Select Stable Linux Kernel
Click “Yes” to proceed further.
Mondo Rescue Backup Process

Proceed Cloning Process
Creating a catalog of “/” filesystem.
Mondo Rescue Making Catalog

Creating Catalog for File System
Dividing filelist into sets.
Mondo Rescue Dividing File List

Dividing File List
Calling MINDI to create boot+data disk.
Mondo Rescue Boot Data Disk

Creating Boot Data Disk
Backing up filesytem. It may take a couple of hours, please be patient.
Mondo Rescue Backup Filesystem

Backing up File System
Backing up big files.
Mondo Rescue Big Files Backup

Big Files Backup
Running “mkisofs” to make ISO Image.
Mondo Rescue Creating ISO

Making ISO Image
Verifying ISO Image tarballs.
Mondo Rescue Verify ISO

Verify ISO
Verifying ISO Image Big files.
Mondo Rescue Verify Big Files

Verify Big Files
Finally, Mondo Archive has completed. Please hit “Enter” to back to the shell prompt.
Mondo Rescue Backup Completed

Backup Completed
If you’ve selected default backup path, you will see an ISO image under “/var/cache/mondo/“, that you can burnt into a CD/DVD for later restore.
To restore all files automatically, boot the system with Mondo ISO Image and at boot prompt type “nuke” to restore files. Here is the detailed video that demonstrates how to restore files automatically from CD/DVD media.


For other distributions, you can also grab Mondo Rescue packages at mondorescue.org download page.

Monday, March 10, 2014

Installing Pure-FTPd on Centos and creating virtual users

FTP virtual user is a user that can upload file on behalf of system user. For example you have a OS user “pradono” and the home directory is /home/pradono, a virtual user “test1″ that is setup on behalf of “pradono”, can upload file to /home/pradono/test1 and the file uploaded will have the ownership as “pradono”.

1. Installing Pure-FTPd using yum

Let’s start by adding an additional CentOS repo
[root@prod1 ~]# cd /etc/yum.repos.d/
[root@prod1 /etc/yum.repos.d]# wget http://centos.karan.org/kbsingh-CentOS-Extras.repo
And enable kbs-CentOS-Testing by editing /etc/yum.repos.d/kbsingh-CentOS-Extras.repo
[root@prod1 /etc/yum.repos.d]# nano -w kbsingh-CentOS-Extras.repo
Change enabled=0 to enabled=1
[...]
[kbs-CentOS-Testing]
name=CentOS.Karan.Org-EL$releasever - Testing
gpgcheck=0
enabled=1
baseurl=http://centos.karan.org/el$releasever/extras/testing/$basearch/RPMS/
Import the repo key
[root@prod1 /etc/yum.repos.d]# rpm --import http://centos.karan.org/RPM-GPG-KEY-karan.org.txt
Install pure-ftpd.
[root@prod1 /etc/yum.repos.d]# yum -y install pure-ftpd

2. Edit the Pure-FTPd config file

[root@prod1 /etc/yum.repos.d]# cd /etc/pure-ftpd/
[root@prod1 /etc/pure-ftpd]# nano -w pure-ftpd.conf
Make sure you have these options enabled
[...]
# If you want simple Unix (/etc/passwd) authentication, uncomment this
UnixAuthentication yes
# If you want to log all client commands, set this to "yes".
# This directive can be duplicated to also log server responses.
VerboseLog yes
# PureDB user database (see README.Virtual-Users)
PureDB /etc/pure-ftpd/pureftpd.pdb
# Automatically create home directories if they are missing
CreateHomeDir yes
The CreateHomeDir option makes adding virtual users more easy by creating a user’s home directory upon login (if it doesn’t already exist).

3. Import OS users to Pure-FTPd FTP Users (Optional)

We can either import users with system-level accounts (defined in /etc/passwd) at once or create new users manually using pure-pw useradd. To import users that already exist on your system into the virtual user database, enter these commands:
The name has to be pureftpd.passwd. This creates pureftpd.passwd file.
pure-pw mkdb imports pureftpd.passwd to the puredb file, in this example /etc/pure-ftpd/pureftpd.pdb.
[root@prod1 /etc/pure-ftpd]# pure-pwconvert >> pureftpd.passwd
[root@prod1 /etc/pure-ftpd]# pure-pw mkdb
Update: Just use UnixAuthentication yes in your pure-ftpd.conf file and you don’t need step 3 above.

4. Add a virtual user.

This adds a virtual user “test” to pureftpd.pass file
[root@prod1 /etc/pure-ftpd]# pure-pw useradd test -u doniking -g doniking -d /home/doniking/test
Password:
Again, this imports the updated pureftpd.passwd file into a puredb file.
[root@prod1 /etc/pure-ftpd]# pure-pw mkdb

5. Testing.

We haven’t restarted pure-ftpd service yet until now. Let’s restart it.
[root@prod1 /etc/pure-ftpd]# service pure-ftpd restart
Stopping pure-ftpd: [ OK ]
Starting pure-ftpd: [ OK ]
Test the user
[root@prod1 /etc/pure-ftpd]# ftp localhost
Connected to doniking.lan.
220---------- Welcome to Pure-FTPd [privsep] [TLS] ----------
220-You are user number 2 of 50 allowed.
220-Local time is now 00:47. Server port: 21.
220-IPv6 connections are also welcome on this server.
220 You will be disconnected after 15 minutes of inactivity.
500 This security scheme is not implemented
KERBEROS_V4 rejected as an authentication type
Name (localhost:root): test
331 User test OK. Password required
Password:
230-User test has group access to: 500
230 OK. Current directory is /
Remote system type is UNIX.
Using binary mode to transfer files.
ftp>

6. Notes.

- Every time you add a virtual user, run
[root@prod1 /etc/pure-ftpd]# pure-pw mkdb
to import pureftpd.passwd to pureftpd.pdb.
- If you want to enable the OS users to ftp, you don’t need to use pure-pwconvert command as others suggest. Simply enable
UnixAuthentication yes
in your /etc/pure-ftpd/pure-ftpd.conf config file.

Thursday, March 6, 2014

How to add Two Gateway on same Linux machine

Q:I have one test server that has Two Interfaces. To one interface i have assigned ip 172.16.122.1 and GW 172.16.xxx.xxx
Now i connected cable to second interface and gave it ip 10.2.2.98.
Now they both on different subnets.
So how do I add the second gateway in /etc/sysconfig/network file. And when i will try to ping then through which interface will it ping the remote system.

A:Technically you can have multiple default gateways but that is the realm of core internet servers, network load balancers, and so on for the most part.

Much more common is a requirement for multiple routes, each with its own router.
Example: You have a computer sitting between two networks, like this: 192.168.1.5/24 and 192.168.2.5/24
You use 192.168.1.1 as Default Gateway - that is the default route for anything not locally attached. Locally attached is explicitly defined as anything which is in any of the subnets on which you have an interface in the UP/RUNNING state and for which there is no explicit static route defined.
In this configuration you already have three routes: A route for everything locally on 192.16.8.1.0/24, with the gateway being your own IP address on that subnet. You have a similar route for the systems on 192.168.2.0/24... And finally you have a default route, that being for "0.0.0.0" pointing to the default gateway. (There are also some other "psuedo" routes on some operating systems, eg for accessing the loopback device, or for broadcast traffic)
Now say there is a router at 192.168.2.2 which provides access to a number of networks. Usually these are "internal" networks. You can now add "static routes" to these networks. Example for a network with subnet 192.168.5.0/24
Linux Example:

route add -net 192.168.5.0 netmask 255.255.255.0 gw 192.168.2.2
 
You can add multiple "static" routes through one router, or routes can use as many routers/gateways as needed.
You can view the table of known routes with the command

netstat -rn
 
The Linux specific command will show the same information in a slightly different format.

ip route show
 
The router(s) specified must "know" how to reach the target network, otherwise it will go to its own default gateway and forward your packets that way.
To make this configuration changes persistent you need to add it to the system configuration files. Static routes are relevant to one specific interface so they do not go into /etc/sysconfig/network. In stead these go into files located in /etc/sysconfig/network-scripts/

For example: /etc/sysconfig/network-scripts/route-eth0
You add "via" entries into this file for routes. These lines read like "Access network X via gateway Y on Network interface device Z.
Example

default 192.168.1.1 dev eth0
192.168.5.0/24 via 192.168.2.2 dev eth0
192.168.6.0/24 via 192.168.2.2 dev eth0
 
And so on.

Monday, March 3, 2014

How To Backup ESXi Configuration – The Missing Piece

“How do I Backup my ESXi USB Key?” Other than ripping the USB key out of a production machine… how was the user to do this? Well, vMA and the vCLI provide a method for this:

Backing up your ESXi Configuration:

To backup your ESXi configuration you’ll be using the vicfg-cfgbackup.pl command as follows:
  • Download either the vMA or vCLI
  • Launch vicfg-cfgbackup.pl:
    C:\Program Files\VMware\VMware vSphere CLI\bin>vicfg-cfgbackup.pl –save –server 192.168.15.253 –username root –password password backup.bak
  • Note: The backup will be stored relative to your user “AppData” path:
    C:\Users\Username\AppData\Local\VirtualStore\

Restoring your ESXi Configuration:

Restoring your ESXi config can be done after you have the host up and responding over the network again by using the following:
C:\Program Files\VMware\VMware vSphere CLI\bin>vicfg-cfgbackup.pl –load –server 192.168.15.253 –username root –password password backup.bak
Note: You will be asked to reboot the host on restore.
Backing  up multiple hosts! – There is a script to backup multiple ESXi hosts on the VMware communities site here. Also in PowerCLI here!

Tuesday, January 21, 2014

3PAR StoreServ Zoning Best Practice Guide

Original text: http://vmfocus.com/2013/08/22/3par-storeserv-zoning-best-practice-guide/

This is an excellent guide which has been written by Gareth Hogarth who has recently implemented a 3PAR StoreServ and was concerned about the lack of information from HP in relation to zoning.  Being a ‘stand up guy’ Gareth decided to perform a lot of research and has put together the ’3PAR StoreServ Zoning Best Practice Guide’ below.
This article focuses on zoning best practices for the StoreServ 7400 (4 node array), but can also be applied to all StoreServ models including the StoreServ 10800 8-node monster.
3PAR StoreServ Zoning Best Practice Guide
Having worked on a few of these, I found that a single document on StoreServ zoning BP doesn’t really exist. There also appears to be conflicting arguments on whether to use Single Initiator – Multiple Target zoning or Single Initiator – Single Target zoning. The information herein can be used as a guideline for all 3PAR supported host presentation types (VMware, Windows, HPUX, Oracle Linux, Solaris etc…).
Disclaimer:  Please note that this is based on my investigation, engaging with HP Storage Architects and Implementation Engineers. Several support cases were opened in order to gain a better understanding of what is & isn’t supported. HP recommendations change all the time, therefore it’s always best to speak with HP or your fabric vendor to ensure you are following latest guidelines or if you need further clarification.
Right, let’s start off with Fabric Connectivity
In terms of host connectivity options the StoreServ 7000 (specifically the 7400) provides us with the following:
  • 4x built-in 8 Gb/s Fibre Channel ports per node pair.
  • Optional 8 Gb/s Quad Port Fibre Channel HBA (Host Bus Adapter) per node (we will be focusing on this configuration option).
  • Optional 10 Gb/s Dual Port FCOE (Fibre Channel over Ethernet) converged network adapter per node.
StoreServ target ports are identified in the following manner Node:Slot:Port.
StoreServ target ports located on the on-board HBA’s will always assume the slot identity of 1, respectively StoreServ targets ports located on the optional expansion slot will always assume the identity of slot 2.
StoreServ nodes are grouped in pairs, it’s important to pay particular attention to this when zoning host initiators (server HBA ports) to the StoreServ Target ports.
StoreServ7000-HostPorts
Recommendations
  • Each HP 3PAR StoreServ node should be connected to two fabric switches.
  • Ports of the same pair of nodes with the same ID (value) should be connected to the same fabric.
  • General rule – odd ports should be connect to fabric 1 and even ports should be connected to fabric 2.
Figure 1a below identifies physical cabling techniques, mitigating against single points of failure using a minimum of two fabric switches, which are separated from each other.
The example below illustrates StoreServ nodes with supplementary quad port HBA’s:
figure 1a_StoreServ_nPcabling
Moving on to Port Persistence
As already covered by Craig in this blog post, a host port would be connected and zoned on the fabric switch via one initiator (host HBA port) to one HP 3PAR StoreServ target port (one-to-one zoning). The pre-designated HP 3PAR StoreServ backup port must be connected to the same fabric as its partner node port.
It is best practice that a given host port sees a single I/O path to HP 3PAR StoreServ. As an option, a backup port can be zoned to the same host port as the primary port, which would result in the host port seeing two I/O paths to the HP 3PAR StoreServ system. This would also result in the configuration where a HP 3PAR StoreServ port can serve as the primary port for a given host port(s) and backup port for host port(s) connected to its partner node port.
Persistent ports leverage SAN fabric NPIV functionality (N_Port ID Virtualization) for transparent migration of a host’s connection, to a predefined partner port on the HP 3PAR StoreServ array during software upgrades or node failure.
One of the ways this is accomplished is by having a predefined host facing port on the 3PAR StoreServ array, so that in the event of upgrade (node shutdown) or node down status the partner port will assume the identity of its partner port. The whole process is transparent to the host. When the node returns to normal I/O is failed back to the original target port.
Although unconfirmed I have heard that in in future releases of Inform OS we will get this level of protection at the port level.
Essentially for this to work Port Persistence requires that corresponding ‘native’ and ‘guest’ StoreServ ports on a node pair, be connected to the same fibre channel fabric.
Requirements for 3PAR Port Persistence:
  • The same host ports on the host facing HBA’s in the nodes in a node pair must be connected to the same fabric switch.
  • The host facing ports must be set to target mode.
  • The host facing ports must be configured for point-to-point connections.
  • The Fibre Channel fabric must support NPIV and have NPIV enabled on the switch ports.
Checking and enabling NPIV
Brocade Fabric OS (ensure you have the appropriate license which enables NPIV)
admin> portcfgshow ‘port#’
If the NPIV capability is enabled, the results of the portcfgshow command will identify this, i.e NPIV capability ON.
If the NPIV capability is not enabled, you can turn it on with the following command:
admin> portCfgNPIVPort ‘port#’ 1   (1 = on, 0 = off)
 Cisco MDS Series Switches
fabSwitch # conf t
fabSwitch(config) # feature npiv (Enables NPIV for all VSANs on the switch)
QLogic SANbox 3800, 5000 and 9000 Switches
Don’t require a license, it’s enabled by default (just ensure you are using firmware version 6.8.0.0.3 or above).
Now let’s cover Switch Zoning (Fibre Channel)
SAN zoning is used to logically group hosts and storage devices together in a physical SAN, so that authorised devices can only communicate with each other if they are in the same SAN zone.
The function of zoning is to:
  • Restrict access so that hosts can only see the data they are authorised to see.
  • Prevent RSCN (Registered State Change Notification) broadcasts.
What are ‘RSCNs’ ? RSCNs are a feature of fabric switches.  It’s a service of the fabric that notifies devices of changes on the state of other attached devices. For example if a device is reset, removed or otherwise undergoes a significant change in status.
These broadcasts are made to all members in the configured SAN zone. As hosts and storage targets can be grouped in a zone its best practice to reduce the impact of these types of broadcasts (Note: an argument against RSCN’s causing issues in zoning tables is that newer HBA’s do a good job limiting the impact of these types of broadcasts).  Nevertheless, I prefer limiting the number of initiators and targets in a fabric zone to a minimum.
Zoning Types
  • Domain, Port zoning uses switch domain id’s and port numbers to define zones.
  • Port World Wide Name or pWWN zoning uses port World Wide Names to define zones. Every port on a HBA has a unique pWWN. (A host HBA comprises of a – nWWN & a pWWN, the nWWN refers to the whole device whereas the pWWN refers to the individual port.
The preferred zoning unit for the 3PAR StoreServ is pWWN. If you are currently using Domain, Port migrating to pWWN is very easy. Simply create new zones based on the pWWN of the host and the pWWN of the storage target, add these new zones to your fabric switches, zoning-out the references to Domain, Port for that respective HBA port. Some fabric vendor’s support mixing both Domain, Port and pWWN in the same zone. I prefer using one or the other explicitly.
The following command outputs the StoreServ ports and partner ports, which can be used to identify the node pWWN’s for zoning.
3PAR01 cli% showport 
HP 3PAR StoreServ supports the following zoning configurations:
  • Single initiator – Single Target per zone (recommended)
  • Single initiator – Multiple Targets per zone
Use Single Initiator – Single Target per zone over Single Initiator Multiple Targets per zone to reduce RSCN’s as previously discussed.
At the time of writing, HP 3PAR OS implementation documentation references Single Initiator Multiple Targets as the recommended zoning type. However, when I queried this I was directed to use Single Initiator – Single Target Zoning.  HP support pointed me in the direction of this document which identifies Single Initiator – Single Target zoning as best practice: http://www8.hp.com/h20195/v2/GetDocument.aspx?docname=4AA4-4545ENW
HP will support Single Initiator – Multiple Target, but you should not have a single host initiator attached to more than two StoreServ target ports!
Host port WWN’s should be zoned in partner pairs. For example if a host is zoned to node port 0:2:1, then it should be zoned to node port 1:2:1 (I’m speculating here, but I guess this is because controller nodes mirror cache I/O, so that in the event of node failure write operations in cache are not lost – hence we zone in node pairs and not across nodes from different pairs).
After you have zoned the host pWWN to the StoreServ node pWWN, you can use the 3PAR CLI showhost command to ensure that each host initiator is zoned to the correct StoreServ target ports (ensuring initiators go to different targets over different fabrics).
Figure 1b represents a staggered approach where you would have odd numbered VMware hosts connecting to nodes 0 & 1, and even numbered hosts connecting to nodes 2 & 3 (Note: currently the StoreServ is designed to tolerate a single node failure only, this includes the 8-node StoreServ 10800 array).
The example depicts Single Initiator – Single Target zoning, so a host with two HBA ports connecting over two fabrics will have a total of four zones (two per fabric). In case you were wondering the maximum allowed is eight (also known as fan-in limitation which is four per fabric).
figure 1b_host_zoning
Here are some additional points to be aware of
 Fan-in/Fan-out ratios:
  • Fan-in refers to a host server port connected to several HP 3PAR storage ports via Fibre Channel switch.
  • Fan-out refers to the HP 3PAR StoreServ storage port that is connected to more than one host HBA port via Fibre Channel switch.
Note: Fan-in over subscription represents the flow of data in terms of client initiator to StoreServ target ports. HP/3PAR documentation states that a maximum of four HP 3PAR storage system ports can fan-in to a single host server port (if you are thinking great, I’ll connect my VMware host to 8 ports [four per fabric] think again.  Using this approach when you have hundreds of hosts can quickly reach the maximum StoreServ port connection limitation which is 64!) it’s just not necessary.
StoreServ Target Port Maximums (As per 3PAR InForm OS 3.1.1 please observe the following):
  • Maximum of 16 hosts initiators per 2Gb HP 3PAR StoreServ Storage Port
  • Maximum of 32 hosts initiators per 4Gb HP 3PAR StoreServ Storage Port
  • Maximum of 32 hosts initiators per 8Gb HP 3PAR StoreServ Storage Port
  • Maximum total of 1,024 host initiators per HP 3PAR StoreServ Storage System
HP documentation states that these recommendations are guidelines, adding more than the recommended hosts should only be attempted, when the total expected workload is calculated and shown not to overrun either the queue depth or throughput of the StoreServ node port.
Note: StoreServ storage ports irrespective of speed, will negotiate at the lowest speed of the supporting fabric switch (keep this in mind when calculating the number of host connections).
The following focuses on changing the target port queue depth on a VMware ESX environment.
The default setting for target port queue depth on the ESX host can be modified to ensure that the total workload of all servers will not overrun the total queue depth of the target HP StoreServ system port. The method endorsed by HP is to limit the queue depth on a per-target basis. This recommendation comes from limiting the number of outstanding commands on a target (HP 3PAR StoreServ system port), per ESX host.
The following values can be set on the HBA running VMware vSphere. These values limit the total number of outstanding commands the operating system routes to one target port:
  • For Emulex HBA target throttle = tgt_queue_depth
  • For Qlogic HBA target throttle = ql2xmaxqdepth
  • For Brocade HBA target throttle = bfa_lun_queue_depth
(Note: for instructions on how to change these values follow VMware KB1267‎, these values are also adjustable on Linux Redhat & Solaris).
The Formula used to calculate these values is as follows:
(3PAR port queue depth [see below]) / (total number of ESX severs attached) = recommended value
The I/O queue depth for each HP 3PAR StoreServ storage system HBA mode is shown below:
Note: The I/O queues are shared among the connected host server HBA ports on a first come first serve basis.
HP 3PAR StoreServ Storage HBA I/O queue depth values
Qlogic 2Gb 497
LSI 2Gb 510
Emulex 4Gb 959
HP 3PAR HBA 4Gb 1638
HP 3PAR HBA 8Gb 3276
Well, hopefully you found the above information useful. Here is a high level summary of what we have discussed:
  • Identify and enable NPIV on your fabric switches (Fibre Channel only feature – NPIV-Port Persistence is not present in iSCSI environments)
  • Use Single Initiator -> Single Target zoning (HP will support Single Initiator – Multiple Target, but you should not have a single host initiator attached to more than two StoreServ target ports).
  • A maximum of four HP 3PAR Storage System ports can fan-in to a single host server port.
  • Zoning should be done using pWWN. You should not use switch port/Domain ID or nWWN.
  • A host (non-hypervisors) should be zoned with a minimum of two ports from the two nodes of the same pair. In addition, the ports from a host zoning should be mirrored across nodes.
  • Hosts need to be zoned to node pairs. For example, zoned to nodes 0 and 1 or to nodes 2 and 3. Hosts should NOT be zoned to non-mirrored nodes such as 0 and 3.
  • When using hypervisors, avoid connecting more than 16 initiators per 4 Gb/s port or more than 32 initiators per 8 Gb/s port.
  • Each HP 3PAR StoreServ system has a maximum number of initiators supported, that depends on the model and configuration.
  • A single HBA zoned with two FC ports will be counted as two initiators. A host with two HBA’s, each zoned with two ports, will count as four initiators.
  • In order to keep the number of initiators below the maximum supported value, use the following recommendations:
    • Hypervisors: four paths maximum.
    • Other hosts (non-hypervisors): two paths to two different nodes of the same port pairs.
  • Hypervisors can be zoned to four different nodes but the hypervisor HBAs must be zoned to the same Host Port on HBAs in the nodes for each Node Pair.
Reference Documents
HP SAN Design Reference Zoning Recommendations
HP 3PAR InForm® OS 3.1.1 Concepts Guide
The HP 3PAR Architecture
HP UX 3PAR Implementation Guide
HP 3PAR Red Hat Enterprise Linux and Oracle Linux Implementation Guide
HP 3PAR VMware ESX Implementation Guide
HP 3PAR StoreServ Storage and VMware vSphere 5 best practices
HP 3PAR Windows Server 2012, Server 2008 Implementation Guide
HP Brocade Secure Zoning Best Practises
HP 3PAR Peer Persistence Whitepaper
An introduction to HP 3PAR StoreServ for the EVA Administrator
Building SANs with Brocade Fabric Switches by Syngress
Monday, January 6, 2014

Handy Tip: How to split large Outlook PST files to make Outlook run faster (for free)


I get a lot of email. My work one is split into a working PST file and an couple of archive PST files. I’ve started to find that the archive files are just far to big. It means that my machine struggles to defragment the archive file, and today I came across a nice Microsoft support tip, that means you can split PST files up into smaller, moremanageable file sizes. If you want to read how to do it, see this Microsoft support article (KB932086). Now I can have Archives by year (e.g. WorkArchive2005, WorkArchive2006, etc). Nice! Once you have migrated all of your email out of the existing PST file, create a new one and set that to be your new default mail file. Outlook does not reduce the size of the existing PST when you move or delete items.

How to use DiskSpd to simulate Veeam Backup & Replication disk actions

This HOW-TO contains information on how to use Microsoft© DiskSpd to simulate Veeam Backup & Replication disk actions to measure disk pe...